How to Build a CEMA 216 Sampling Plan: A Step-by-Step Field Guide
Part 2 of the CEMA 216 Farmer’s Guide: turn the conservation objective into a mapped, repeatable sampling plan; collect the required three composites correctly; and preserve the field record for final-year monitoring.
SH
By Soil Health Exchange Team||15 min read|61 reads
For each CEMA 216 instance, agree on the objective and planning land unit before fieldwork. Choose a random, stratified, problem-area, or combined design that matches the question. Collect at least three representative main locations; at each location, combine the center sample with four subsamples taken about 20–50 feet away. Keep the resulting three composite samples separate. Use a clean spade and a uniform vertical slice to a 6–8-inch sampling depth when practical, or a probe with an inside diameter of at least 1 inch when a slice is impractical. Record WGS84 coordinates, sample IDs, timing, conditions, and recent management; follow the laboratory’s cold-storage and shipping instructions; and preserve the same locations, season, depth, laboratory, tests, and methods for the final-year comparison.
This guide was checked against the national CEMA 216 standard and job aid listed by NRCS as 04-2026, the April 10, 2026 CEMA 216 FAQ, and NRCS Technical Notes 470-07 and 470-16. Use the activity-specific CEMA 216 documents for a CEMA 216 contract when general soil-health sampling guidance differs .
One contracted instance requires at least three main sampling locations. Each main location contributes one center sample plus four surrounding subsamples, for five subsamples per location and 15 field collections total. Combine each group of five into its own composite. Send three separate composite samples to the laboratory [1][2][3].
The required 3 × 5 structure
Planning level
Minimum count
What stays separate
Contracted CEMA 216 instance
1
Defined objective, PLU, design, and report
Representative main locations
At least 3
Each location becomes one laboratory composite
Field collections per main location
5: center + 4 surrounding subsamples
Mix only the five belonging to that location
Laboratory composite samples
At least 3
Keep separate through labeling, handling, analysis, and reporting
The three composites preserve information from the three representative locations. Do not mix all 15 field collections into one bag [1][2][3].
Do not copy the one-composite example from general grab-sampling guidance
NRCS Technical Note 470-07 contains a general example that mixes 15 collections into one composite. Current CEMA 216 instructions are different: five subsamples form one composite at each of three representative locations, producing three separate laboratory samples. Follow the current activity-specific standard, job aid, FAQ, contract, and QI-approved plan [1][2][3][4].
Step 1: Define the question and planning land unit
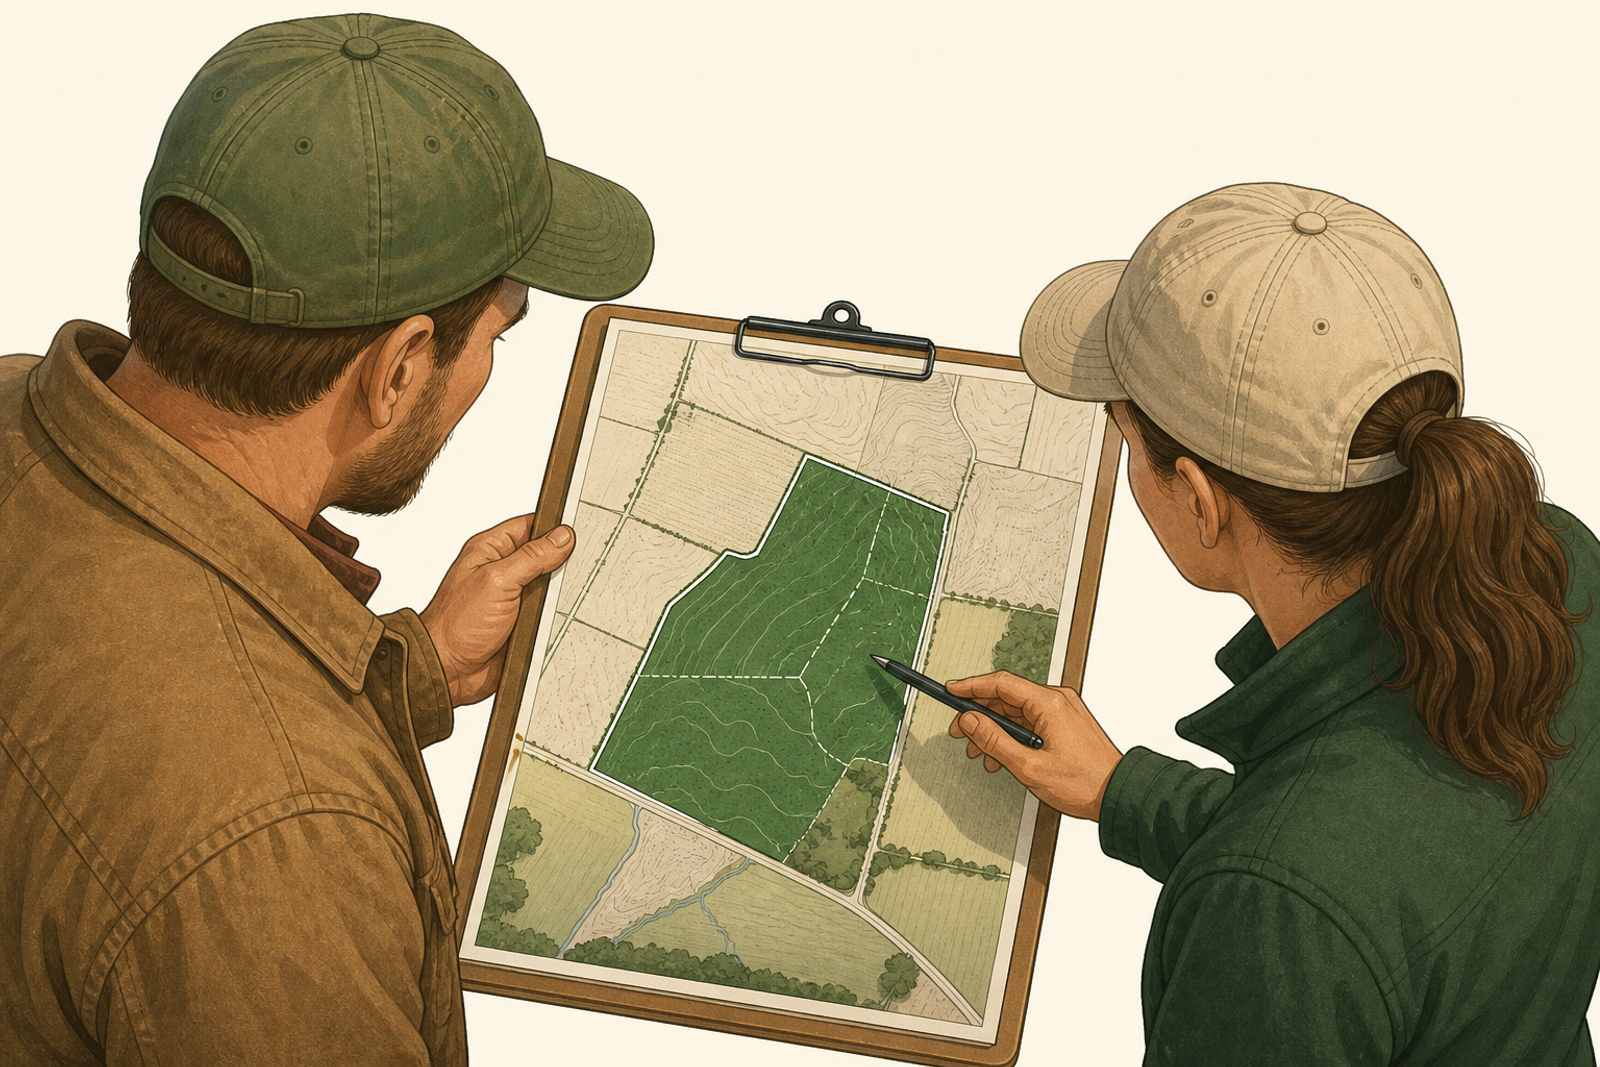
Write the monitoring question before placing points. Examples include tracking one management system through the contract, comparing a poor-performing area with a productive area, or representing major soil and landscape zones within a planning land unit (PLU). The planner and producer determine the sampling area from planning assessments and producer objectives; CEMA 216 does not impose one national acreage limit per instance [1][3].
Use soil type, land use, topography, slope position, drainage, crop rotation, tillage, grazing, amendments, yield history, and the locations of applicable resource-concern assessments to draw the PLU and identify meaningful variation. Web Soil Survey can support this review, but mapped soil information does not replace the laboratory texture measurement required by CEMA 216 [1][7].
Click to expand
Start with one defined PLU and one monitoring question. Review soil, landscape, land-use, and management information before selecting points [1][4]. — Photo: Soil Health Exchange instructional illustration (AI-assisted); technical basis: USDA NRCS CEMA 216 and TN 470-07
Step 2: Choose the design that answers the question
CEMA 216 sampling strategies
Design
Use when
Point-selection rule
Interpretation
Random
The PLU is reasonably homogeneous with few problem areas
Assign random numbers to grid areas and use the selected positions
Represents the defined uniform unit
Stratified
Soil types, landscape positions, drainage, or management form meaningful zones
Delineate strata, then choose random positions within them in proportion to their PLU area
Represents known sources of variation without averaging them blindly
Problem comparison
Distinct areas show uneven crop or forage performance
Purposefully sample the problem area, a productive comparison, and an undisturbed or reference area
Answers a targeted comparison; it does not estimate a whole-field average
Combined
The objective needs both representation and a defined comparison
Document which rule selected each point or contracted instance
Interpret each group according to its stated purpose
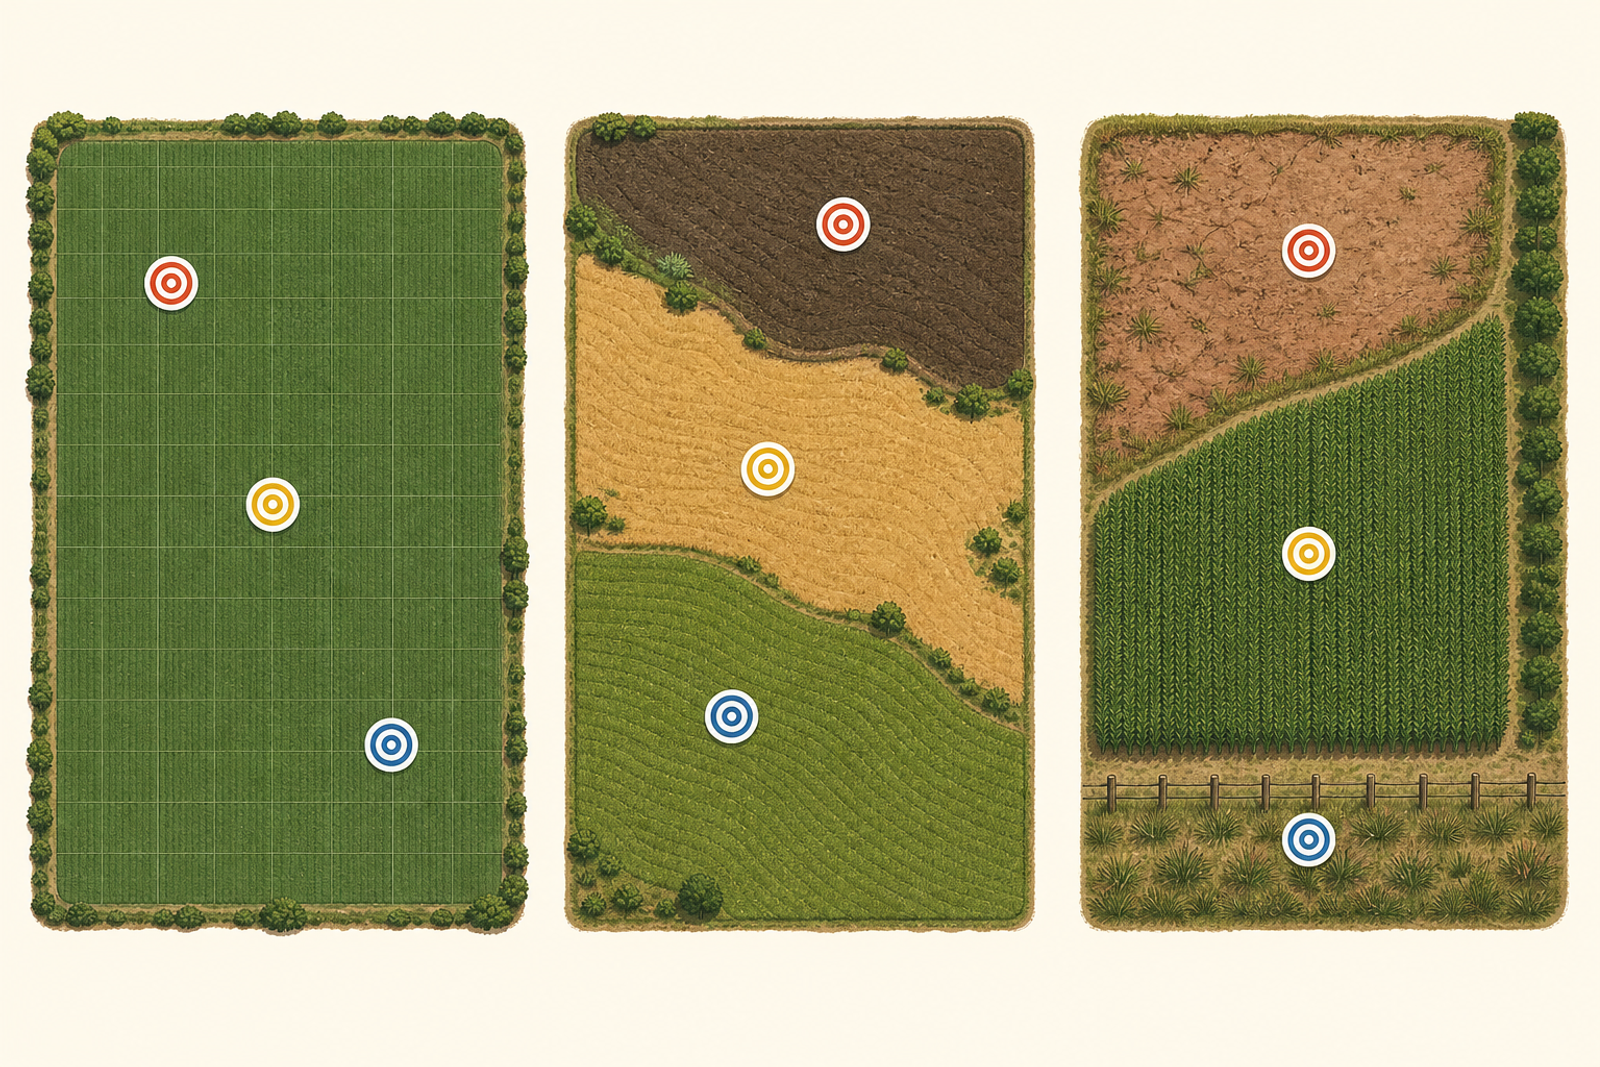
The standard permits a combination of strategies. Record how every point was selected; a convenience route is not a random design [1].
Click to expand
Left: random points in a uniform field. Center: points placed within mapped soil or landscape strata. Right: a purposeful problem, productive, and fence-line reference comparison [1][2]. — Photo: Soil Health Exchange instructional illustration (AI-assisted); technical basis: USDA NRCS CEMA 216
Step 3: Select at least three representative main locations
Place at least three main locations according to the chosen design. CEMA 216 directs collection at the same locations where applicable in-field resource-concern assessments were completed. Align the sample points with those assessment records unless the agreed design establishes a documented comparison [1].
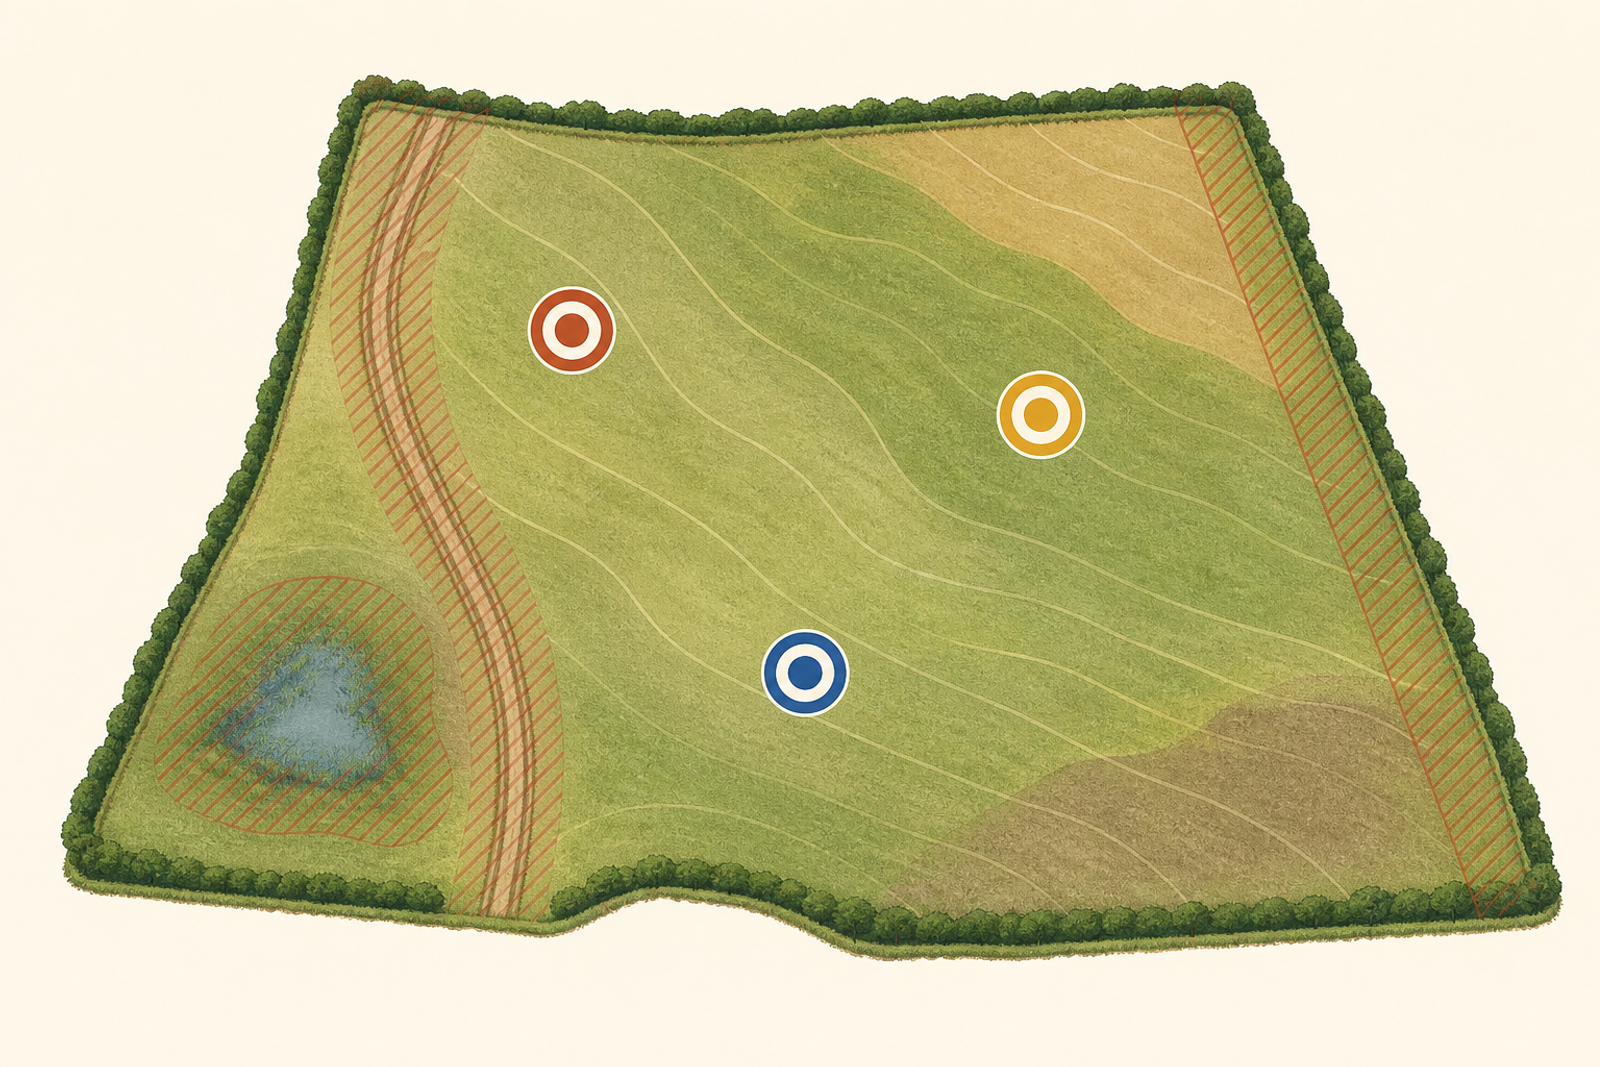
Avoid wheel tracks, drive lanes, field borders, depressions, saturated soil, soil-map boundaries, fertilizer bands, eroded and non-eroded soil mixed together, different landscape positions, different rotations, and row/inter-row positions unless the design specifically targets or separates that variation. A point can be representative of a defined problem area; it cannot be both an accidental hot spot and a whole-field representative point [1][4].
Click to expand
The exclusion marks show areas to avoid unless they are part of the stated sampling objective. Keep all three main locations inside the mapped PLU [1][4]. — Photo: Soil Health Exchange instructional illustration (AI-assisted); technical basis: USDA NRCS CEMA 216 and TN 470-07
Step 4: Add four subsamples around every main location
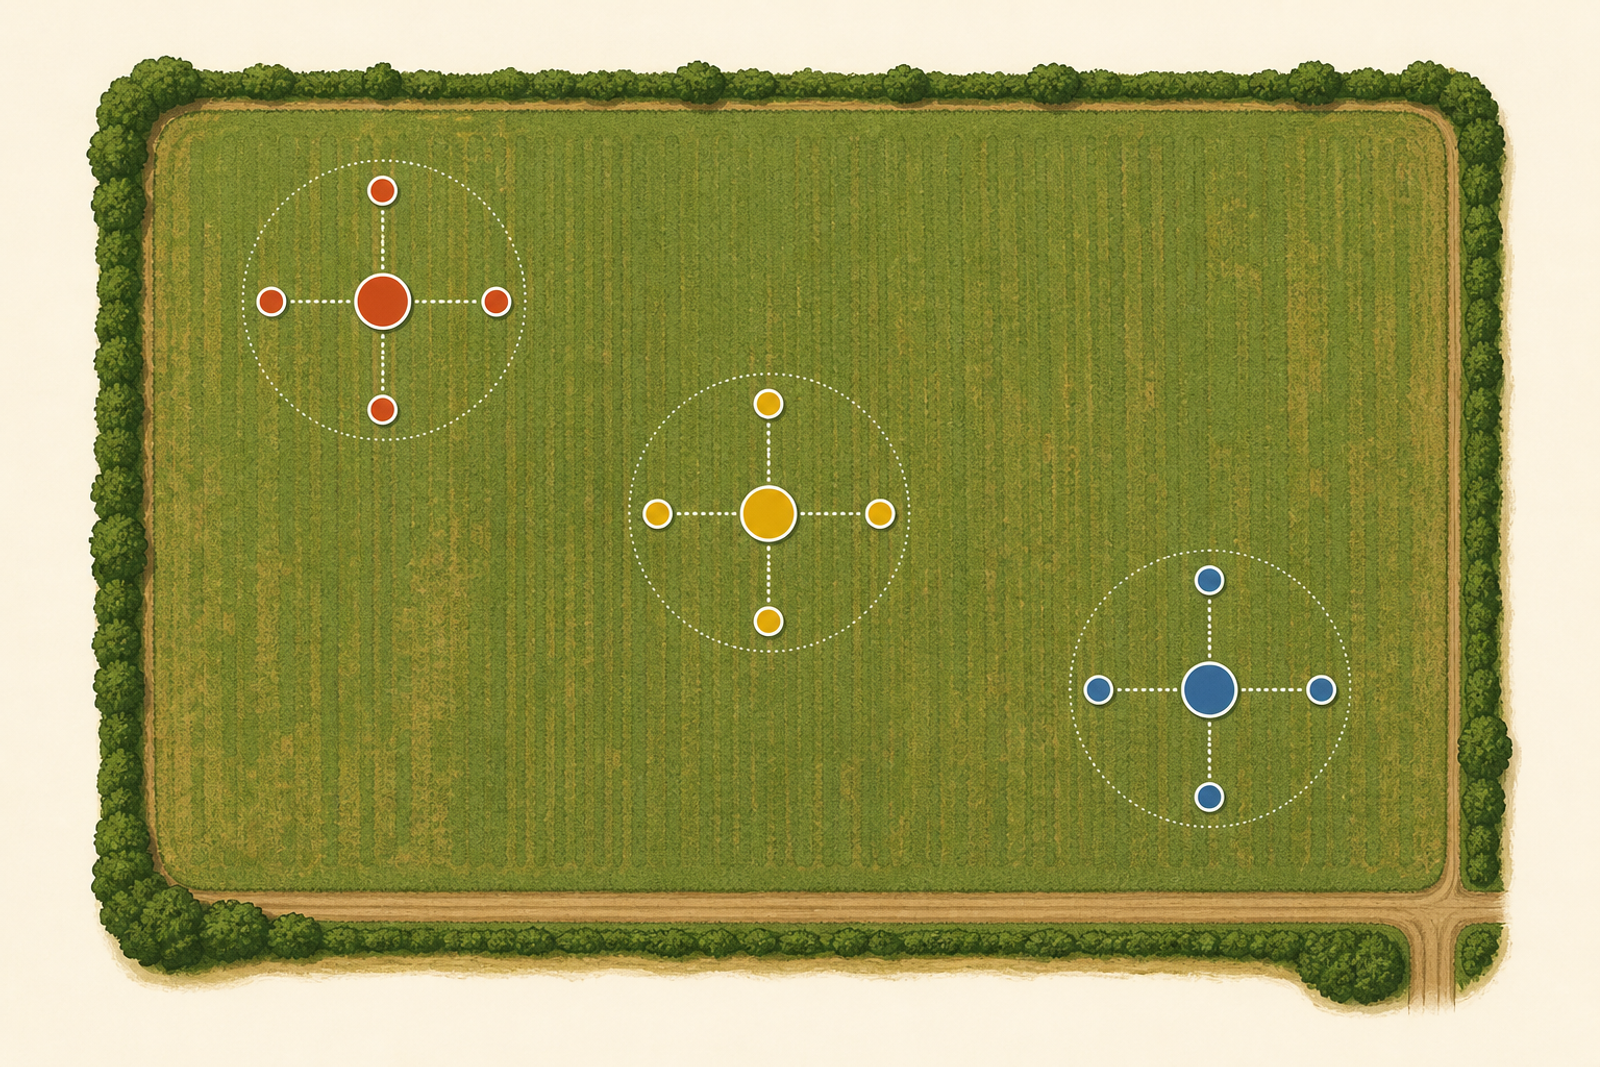
At each main location, collect the center sample and four additional subsamples about 20–50 feet from the center. Keep all five within the same soil, land use, management, and comparison area represented by that main location. On a narrow zone or near a boundary, adjust directions while preserving the intended area and document the layout [1][3].
Click to expand
Each color is one composite: one center plus four surrounding subsamples, about 20–50 feet from the center. Three clusters produce 15 field collections and three laboratory composites [1][3]. — Photo: Soil Health Exchange instructional illustration (AI-assisted); technical basis: USDA NRCS CEMA 216
Step 5: Set the date, laboratory protocol, tools, and depth
Contact the selected laboratory before fieldwork. Confirm the required sample amount, containers, temperature, maximum holding time, shipping day, and any method-specific instructions. Collect during the crop year, at the same time of year for later monitoring, under moderate soil moisture and temperature, and away from recent tillage, amendments, fertilizer, or chemical inputs. General NRCS guidance suggests waiting 3–4 weeks after a chemical application when pre-application sampling is not possible; the QI and laboratory should confirm suitability for the selected CEMA methods [1][3][4].
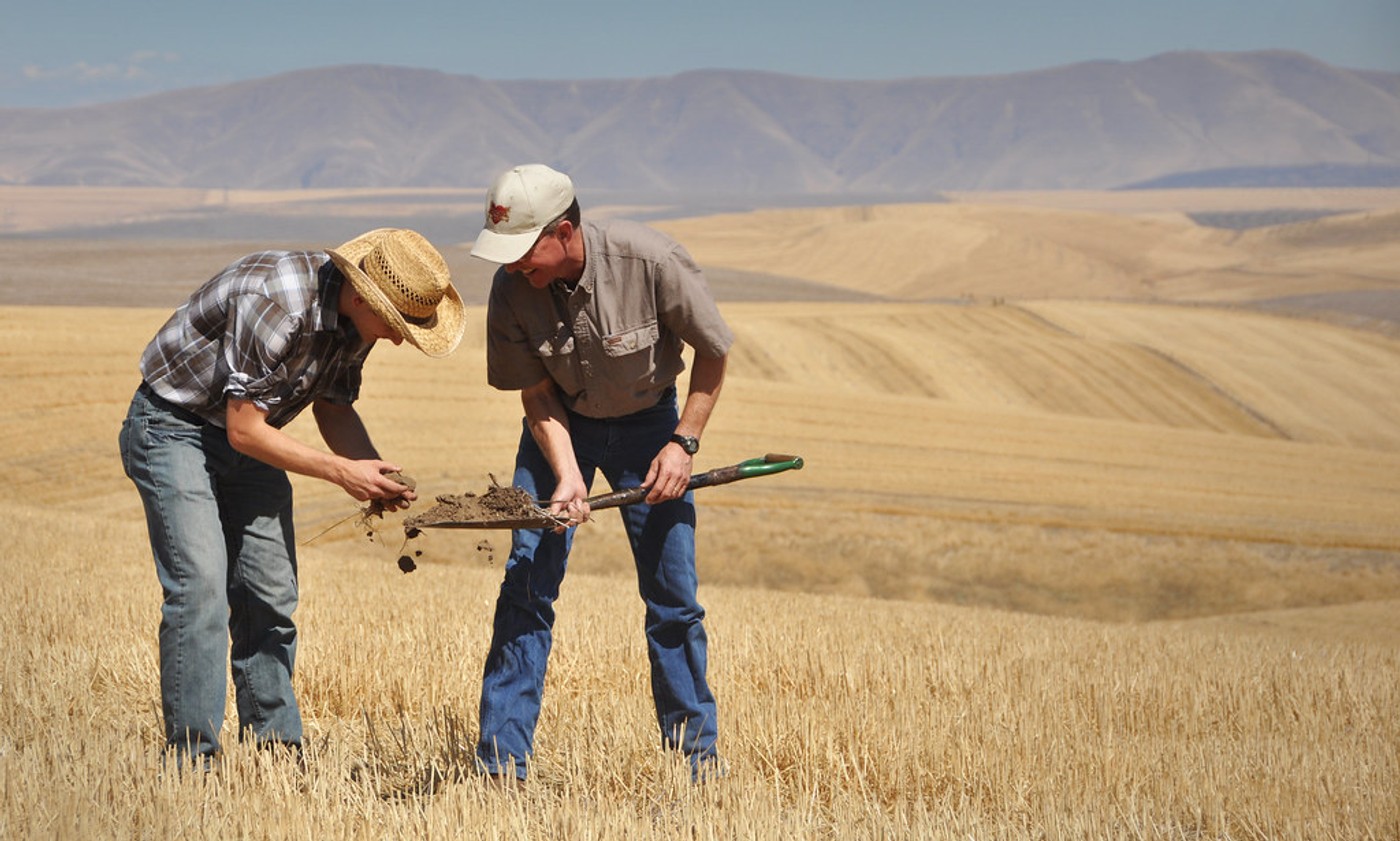
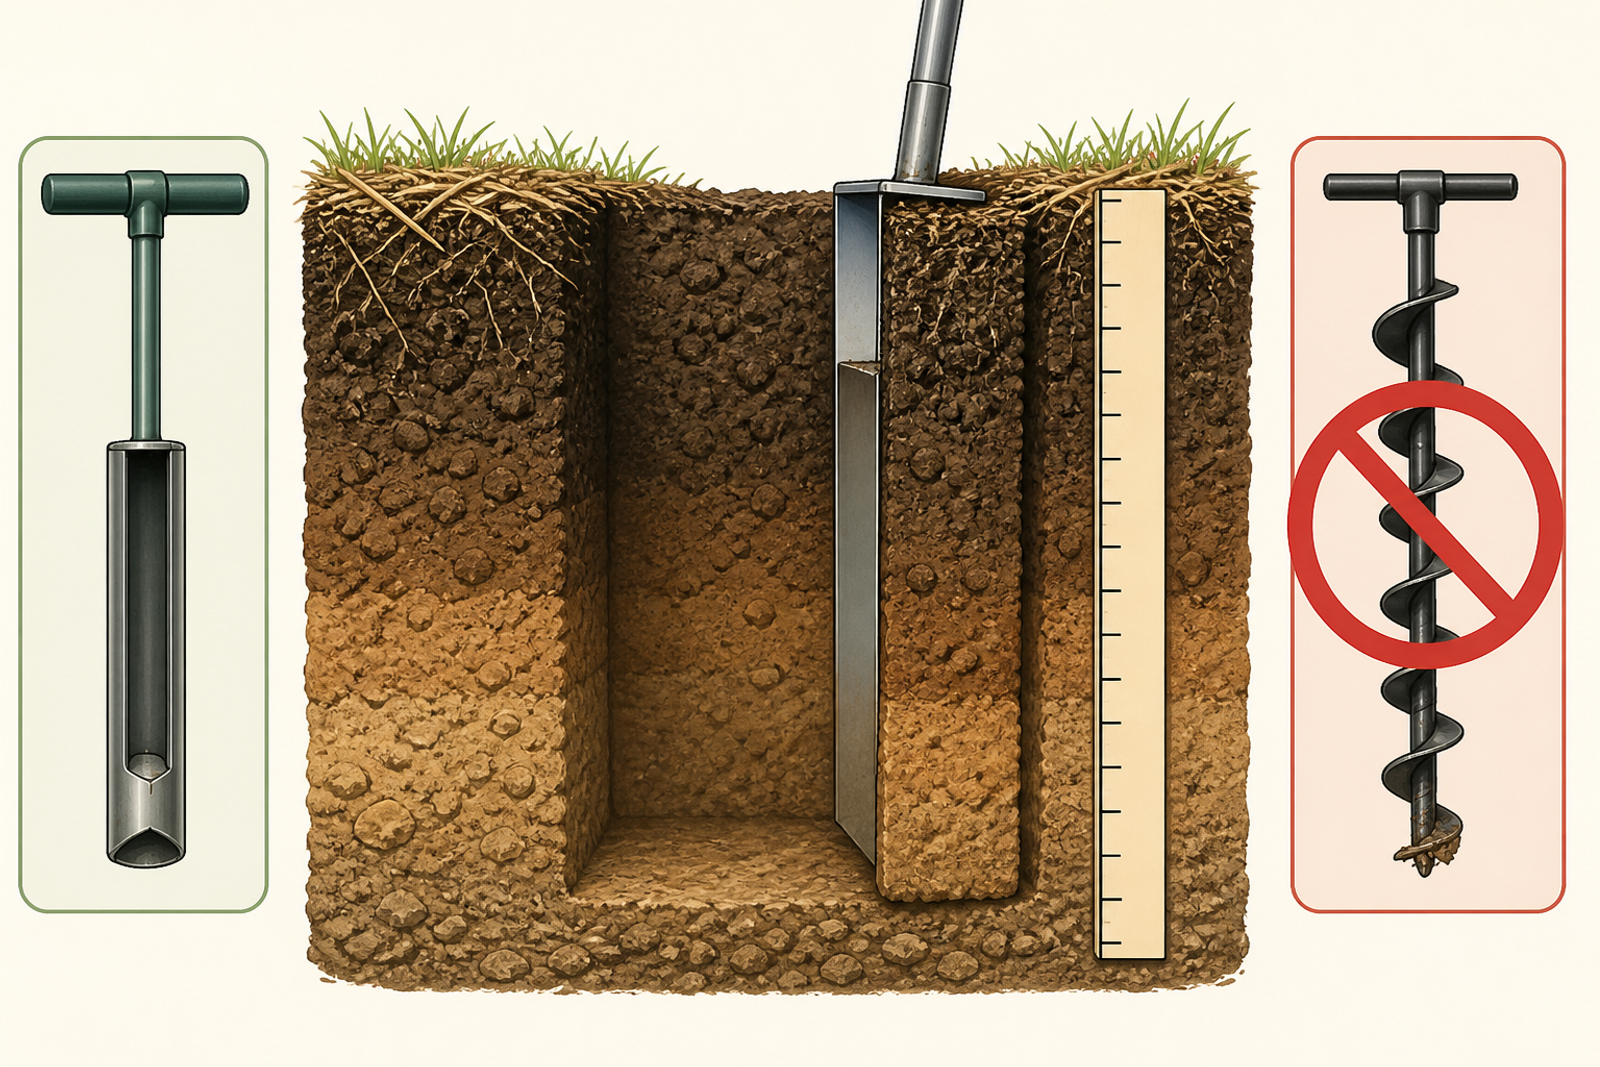
Remove surface vegetation or debris. When practical, dig an 8-inch hole with a clean tile spade, sharpshooter, or straight shovel and remove a uniform rectangular vertical slice about 2 inches thick to the required 6–8-inch sampling depth. Keep the slice the same thickness from top to bottom. If a slice is impractical, use a soil probe with an inside diameter of at least 1 inch. Dutch and spiral augers are not acceptable because they destroy or compact aggregates [1][2][3].
Use the current CEMA 216 depth instruction
The CEMA 216 job aid specifies a 6–8-inch sampling depth, and the standard describes an 8-inch hole with a uniform vertical slice 6–8 inches deep. This means a slice extending down through the sampled profile, not a thin sample taken only from the 6–8-inch horizon. Older general soil-health notes may show 0–6-inch or 4–6-inch examples. For a CEMA 216 contract, document and repeat the current activity-specific depth approved by the QI and NRCS [1][2][4][5].
Click to expand
Preferred: a uniform 2-inch-thick vertical slice to a 6–8-inch sampling depth. Allowed when a slice is impractical: a probe at least 1 inch in inside diameter. Prohibited: Dutch or spiral augers [1][2][3]. — Photo: Soil Health Exchange instructional illustration (AI-assisted); technical basis: USDA NRCS CEMA 216
Step 6: Build three separate composite samples
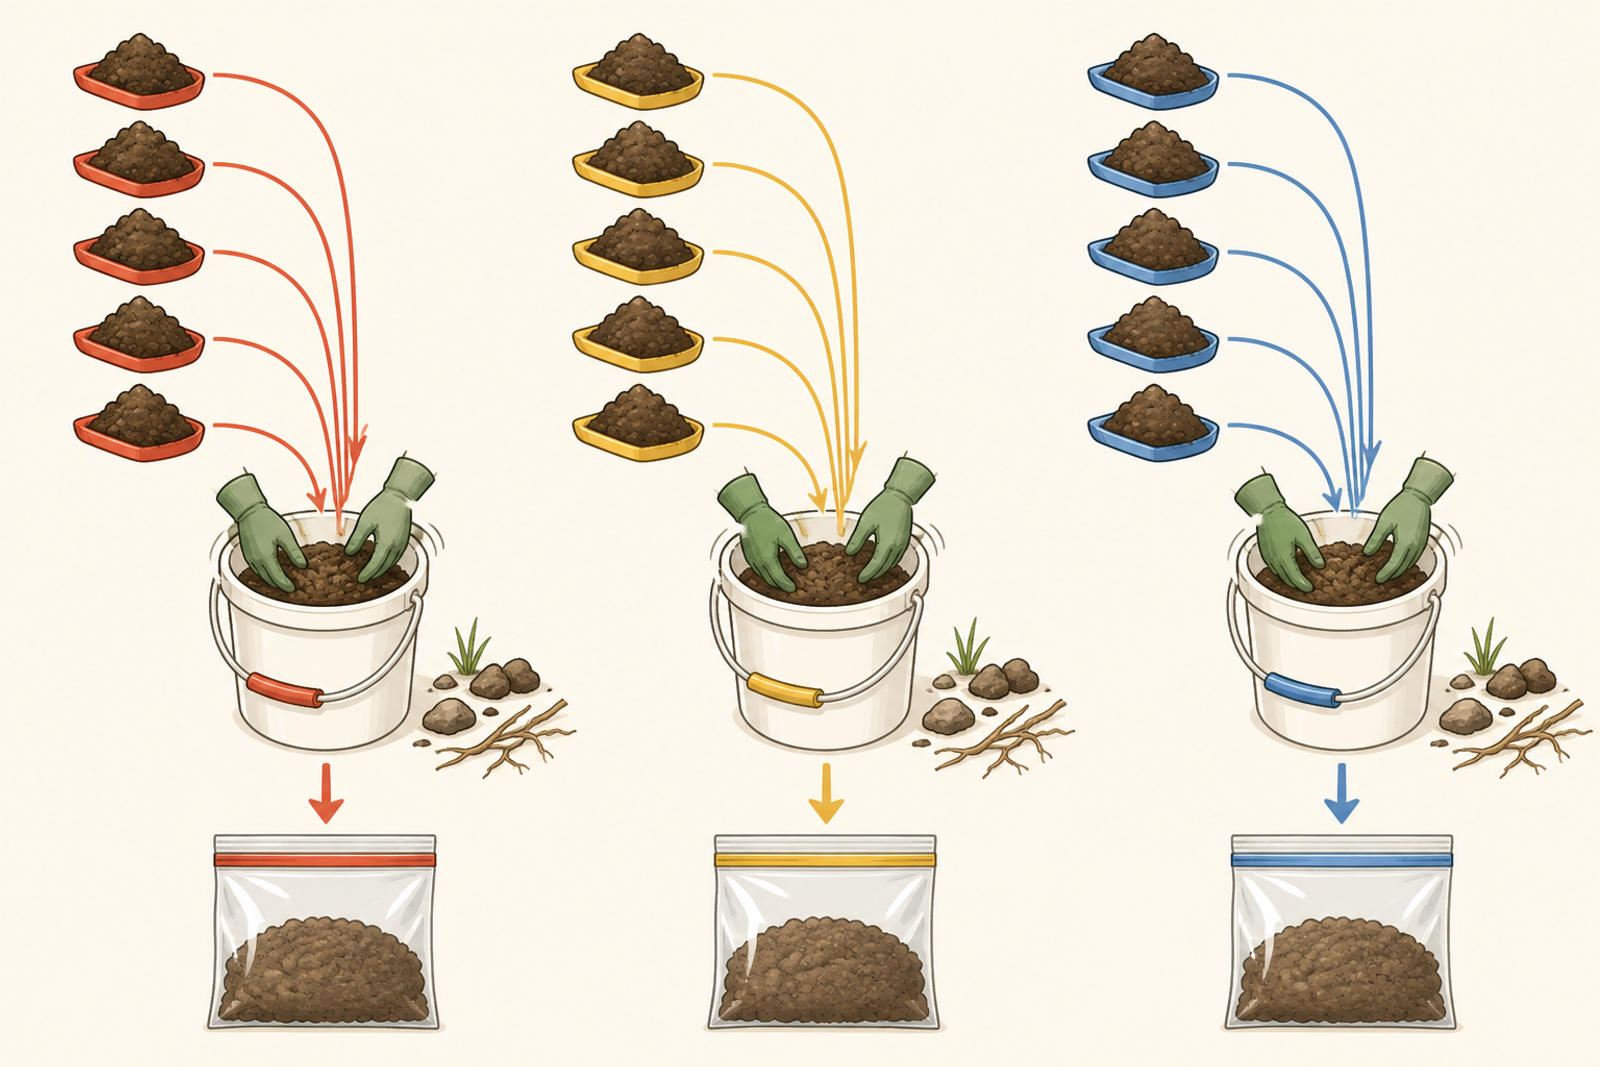
Place the five field collections from the first main location into one clean container. Gently break large clods, remove stones, roots, and debris, and mix without pulverizing natural aggregates. Transfer the laboratory-required amount into the first bag. Repeat independently for the second and third locations. Use three clean containers or clean equipment thoroughly between composites so soil is not transferred across locations [1][3].
All tools must be clean and free of residue before collection. When collecting PLFA, sanitize equipment between composite samples. Follow any more restrictive laboratory cleaning instruction [1].
Click to expand
Red stays with red, gold with gold, and blue with blue. Five subsamples form each composite; the three composites never share a bucket or bag [1][3]. — Photo: Soil Health Exchange instructional illustration (AI-assisted); technical basis: USDA NRCS CEMA 216
Step 7: Label, map, and document each composite
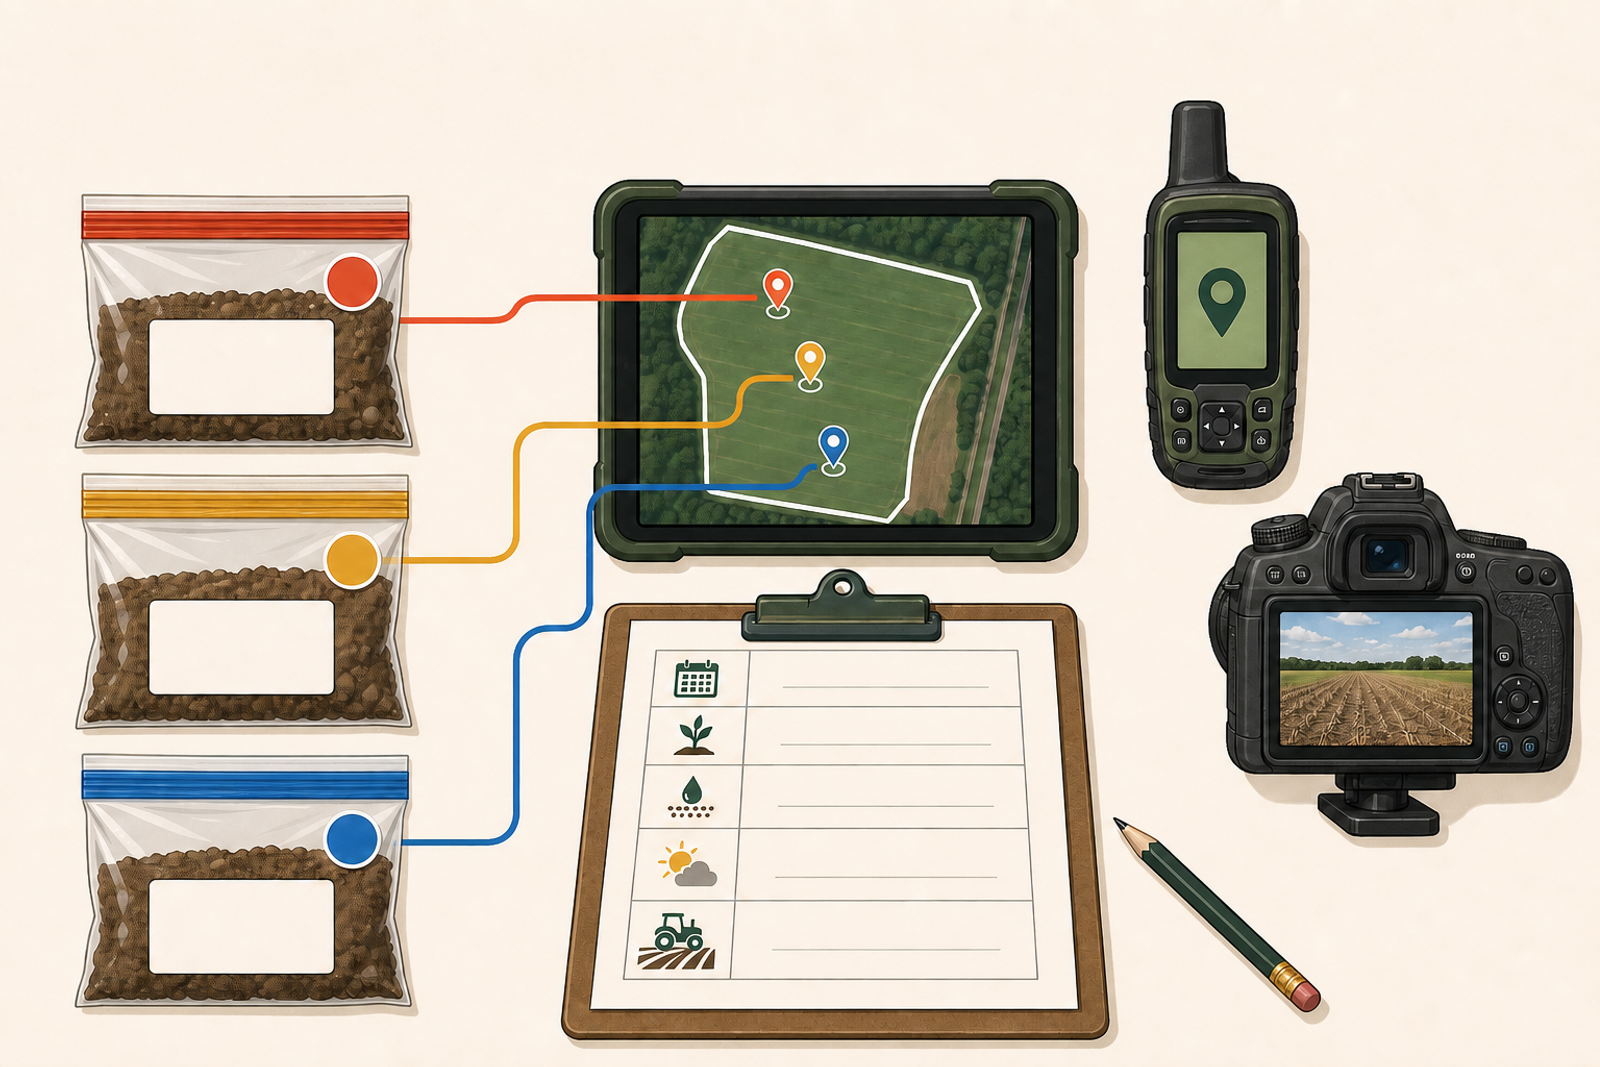
At minimum, CEMA 216 directs the bag to carry the representative-location name and collection date. A stronger repeatability record also includes the PLU or instance ID, unique composite ID, collector, selected laboratory package, and matching point color or code. Record the PLU polygon and WGS84 latitude-longitude for the sampling locations [1][3].
Click to expand
Tie each bag to one map point and one field record. WGS84 coordinates, conditions, and photographs help the final-year team reproduce the baseline [1][3]. — Photo: Soil Health Exchange instructional illustration (AI-assisted); technical basis: USDA NRCS CEMA 216
What to record at each main location
Record
Minimum or recommended content
Why it matters
Identity
PLU or instance ID, main-location name, composite ID, date, collector
Links the bag, laboratory report, map, and CEMA report
Location
WGS84 latitude-longitude and PLU polygon; retain the planned point map
Allows return to the same georeferenced locations
Field condition
Soil moisture, temperature category, saturation, recent weather, residue, crop stage
Explains biological and physical differences between dates
Laboratory, exact tests and methods, storage, shipment time, temperature
Protects comparability and sample integrity
CEMA deliverables require the sampling strategy, map, points, results, interpretation, and monitoring schedule. These field details make those deliverables reproducible [1].
Step 8: Cool, protect, and ship the samples
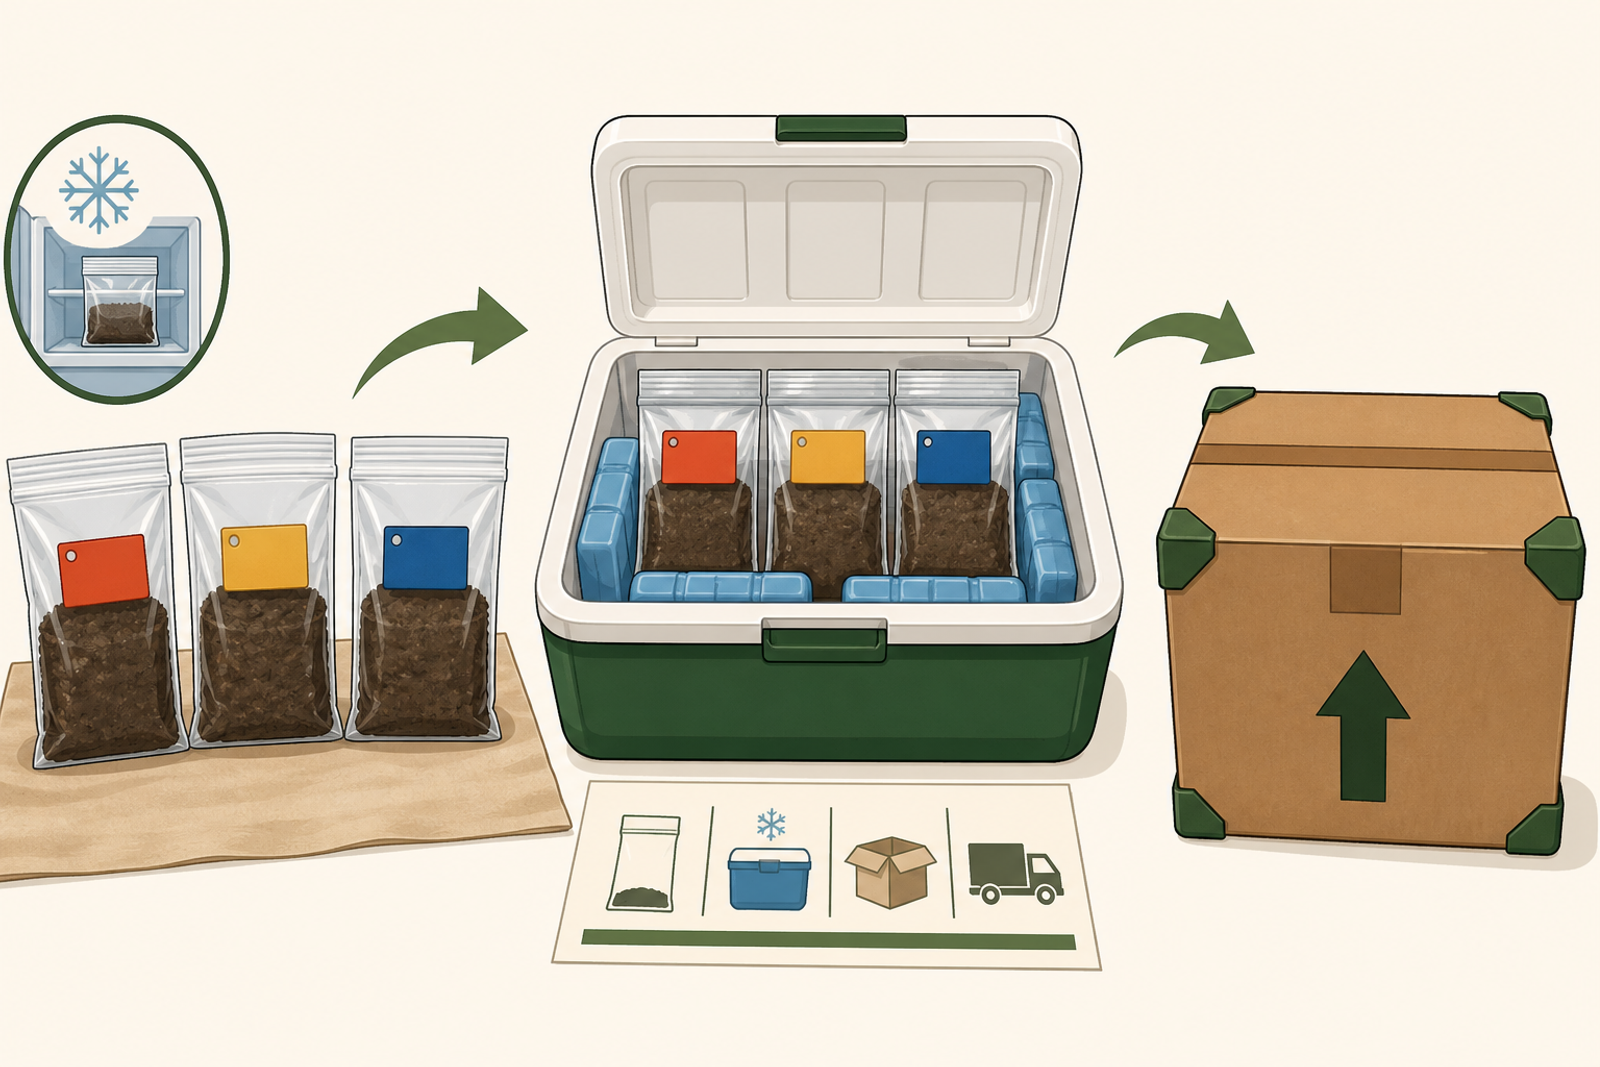
Keep bags cool and out of sunlight. If samples are not sent immediately, store them in a cooler or refrigerator according to the receiving laboratory’s instructions. Use a rigid container when the laboratory requests protection for intact aggregates [1][3][4].
Handling by testing scenario
Sample or test
CEMA 216 handling direction
Planning note
Scenario 1 soil-health suite
Keep cool; use a cooler or refrigerator if not shipped immediately; send promptly
Confirm the strictest requirement among the selected methods before collection
PLFA in optional Scenario 2
Ice in the field, freeze immediately, and ship on ice as soon as possible by overnight service
Coordinate with the lab and avoid a shipment that arrives after the lab closes or over a weekend
Enzymes in optional Scenario 2
Refrigerate, protect between ice packs, and ship overnight
Freeze only when the receiving laboratory instructs it
The laboratory’s written instructions control the exact containers, temperature, and holding time. Preserve those instructions with the project file [1][3].
Click to expand
Confirm the laboratory protocol before fieldwork. Keep the three composites separate and protected; optional PLFA has an immediate-freezing and overnight-on-ice pathway [1][3]. — Photo: Soil Health Exchange instructional illustration (AI-assisted); technical basis: USDA NRCS CEMA 216
Step 9: Preserve the baseline for the return visit
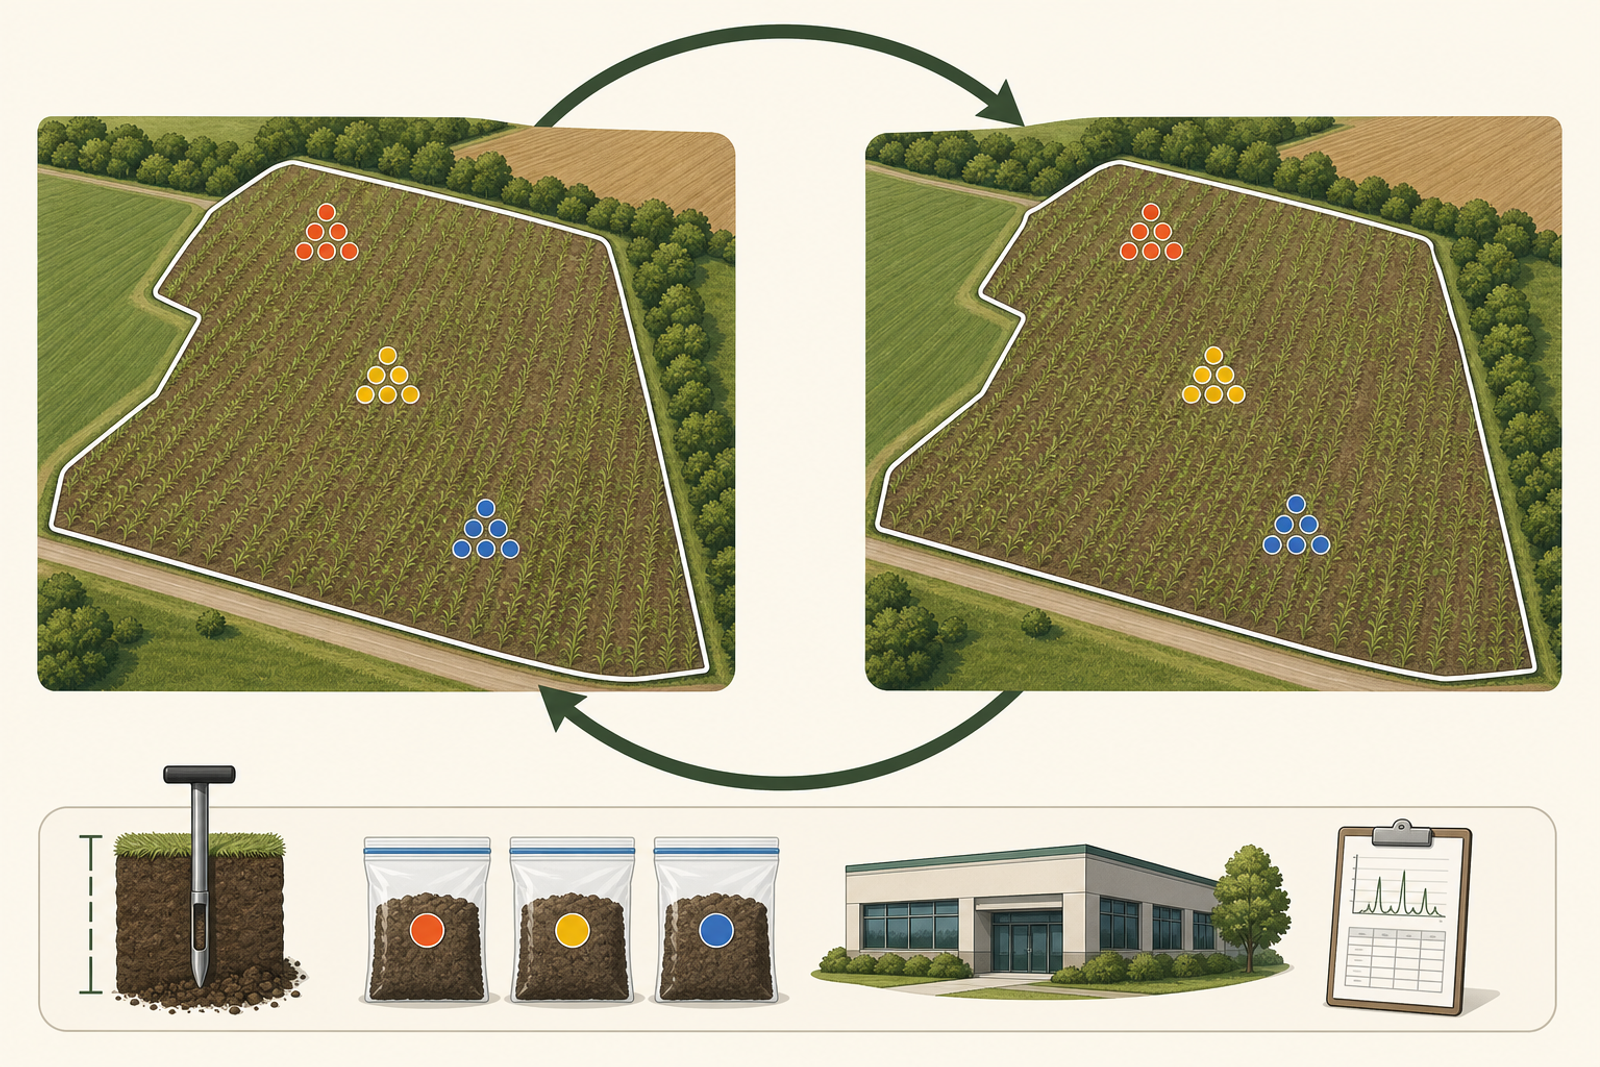
CEMA 216 monitoring is most interpretable when the final-year team uses the same georeferenced locations, sampling strategy, time of year, sampling depth, field conditions, laboratory, tests, and analytical methods. Store the field map, coordinates, photos, bag IDs, field sheet, laboratory submission form, shipping record, report, and any deviations in one project record [1][3][5].
Exact weather cannot be repeated. The objective is to keep controllable conditions as similar as practical and document differences. If the field boundary, management, laboratory, or method changes, record the break rather than presenting the two values as a seamless trend [1][3][5].
Click to expand
Repeat the sampling question, points, season, depth, field conditions, laboratory, and methods as closely as practical. Document every unavoidable change [1][3][5]. — Photo: Soil Health Exchange instructional illustration (AI-assisted); technical basis: USDA NRCS CEMA 216 and TN 470-16
Pre-field conference checklist
□ The producer, QI, and NRCS field office agree on the objective, PLU, contracted instance, and deliverables.
□ The map shows the PLU boundary, applicable assessment points, soil or management zones, exclusions, and at least three main locations.
□ The design is identified as random, stratified, problem comparison, or a documented combination.
□ Four surrounding subsample positions can remain within the same represented area at every main location.
□ The selected laboratory has confirmed every required method, sample amount, containers, temperature, holding time, and shipping day.
□ The planned date avoids extreme soil moisture or temperature and recent disturbance or inputs.
□ The collector has a clean spade or sharpshooter, an allowed probe if needed, clean composite containers, bags, labels, GPS set to WGS84, field sheets, cooler, and cold packs.
□ The team knows how PLFA or enzyme samples will be cooled, frozen when required, and delivered overnight.
□ APHIS soil-movement restrictions have been checked when the soil may be prohibited, regulated, or quarantined [1][6].
Common sampling-plan failures
What fails and how to correct it
Failure
Why it matters
Correction
Mixing all 15 collections into one bag
Erases the required three-location structure
Create three composites of five and keep them separate
Calling a road-edge convenience route random
Selection is biased and cannot support the stated design
Use a grid or geospatial randomization method and retain the selected points
Crossing soil, management, slope, or wetness boundaries within one cluster
The composite blends different populations
Move the surrounding points inward or use a stratified design
Collecting only the 6–8-inch horizon
Misreads the activity’s vertical sampling-depth instruction
Collect a uniform vertical slice extending to the approved 6–8-inch depth
Using a Dutch or spiral auger
Destroys or compacts aggregates
Use the preferred spade slice or an allowed probe at least 1 inch in inside diameter
Sampling just after tillage, fertilizer, manure, or a chemical application
Creates a temporary physical or biological pulse
Reschedule under moderate, comparable conditions after the agreed waiting period
Changing the laboratory or approved method at follow-up
Creates a method break that can resemble a soil change
Repeat the baseline method or document and interpret the break explicitly
Shipping biologically sensitive samples warm or over a weekend
Microbial composition or activity can change before analysis
Follow the laboratory’s cold-chain and arrival schedule
Resolve these issues before collection whenever possible; after collection, document the deviation and consult the QI and NRCS before relying on the sample [1][3].
Who is responsible for the plan?
Roles before, during, and after sampling
Role
Sampling-plan responsibility
Producer
Defines objectives and management history; selects the QI; confirms access, timing, and practical field conditions
Qualified Individual
Leads the pre-work conference; designs or approves the strategy; verifies methods and handling; supervises collection; signs and completes the report
NRCS field office
Confirms the contracted activity, planning context, applicable PLU, deliverables, and acceptance requirements
Sample collector
Follows the approved map, depth, tools, cleaning, compositing, labeling, recording, and handling protocol under QI guidance
Laboratory
Provides method-specific collection and shipping instructions; receives three traceable composites; reports the selected approved methods and units
A collector may work under a QI’s guidance, but the supervising QI remains accountable for protocol adherence and the report [1][3].
The nine-step field sequence
Define the monitoring question and PLU.
Choose and document the random, stratified, problem, or combined design.
Map at least three representative main locations and planned exclusions.
Add four surrounding subsamples about 20–50 feet from each center.
Confirm timing, laboratory protocol, tools, and a uniform 6–8-inch sampling depth.
Collect five field portions per location and build three separate composites.
Label every bag and record the matching WGS84 points, conditions, and management timing.
Cool, protect, and ship according to the strictest selected test requirement.
Archive the baseline so the final-year team can repeat the plan.
CEMA 216 sampling is not a nutrient-management sampling plan
CEMA 216 monitors selected physical, chemical, and biological soil-health indicators. Do not use its results alone to develop fertilizer rates. CEMA 217 and regionally calibrated fertility protocols address nutrient-management sampling. When both activities are collected together, reconcile their depth, tools, locations, timing, containers, and laboratory requirements before fieldwork [3].
Soil Health Exchange Team (2026). How to Build a CEMA 216 Sampling Plan: A Step-by-Step Field Guide. Soil Health Exchange. https://soilhealthexchange.com/blog/cema-216-sampling-plan-field-guide
More citation formats
MLA
Soil Health Exchange Team. "How to Build a CEMA 216 Sampling Plan: A Step-by-Step Field Guide." Soil Health Exchange, 2026-08-08, https://soilhealthexchange.com/blog/cema-216-sampling-plan-field-guide.
Chicago
Soil Health Exchange Team. "How to Build a CEMA 216 Sampling Plan: A Step-by-Step Field Guide." Soil Health Exchange. Published 2026-08-08. https://soilhealthexchange.com/blog/cema-216-sampling-plan-field-guide.
Discussion
No comments yet. Be the first to share your thoughts!