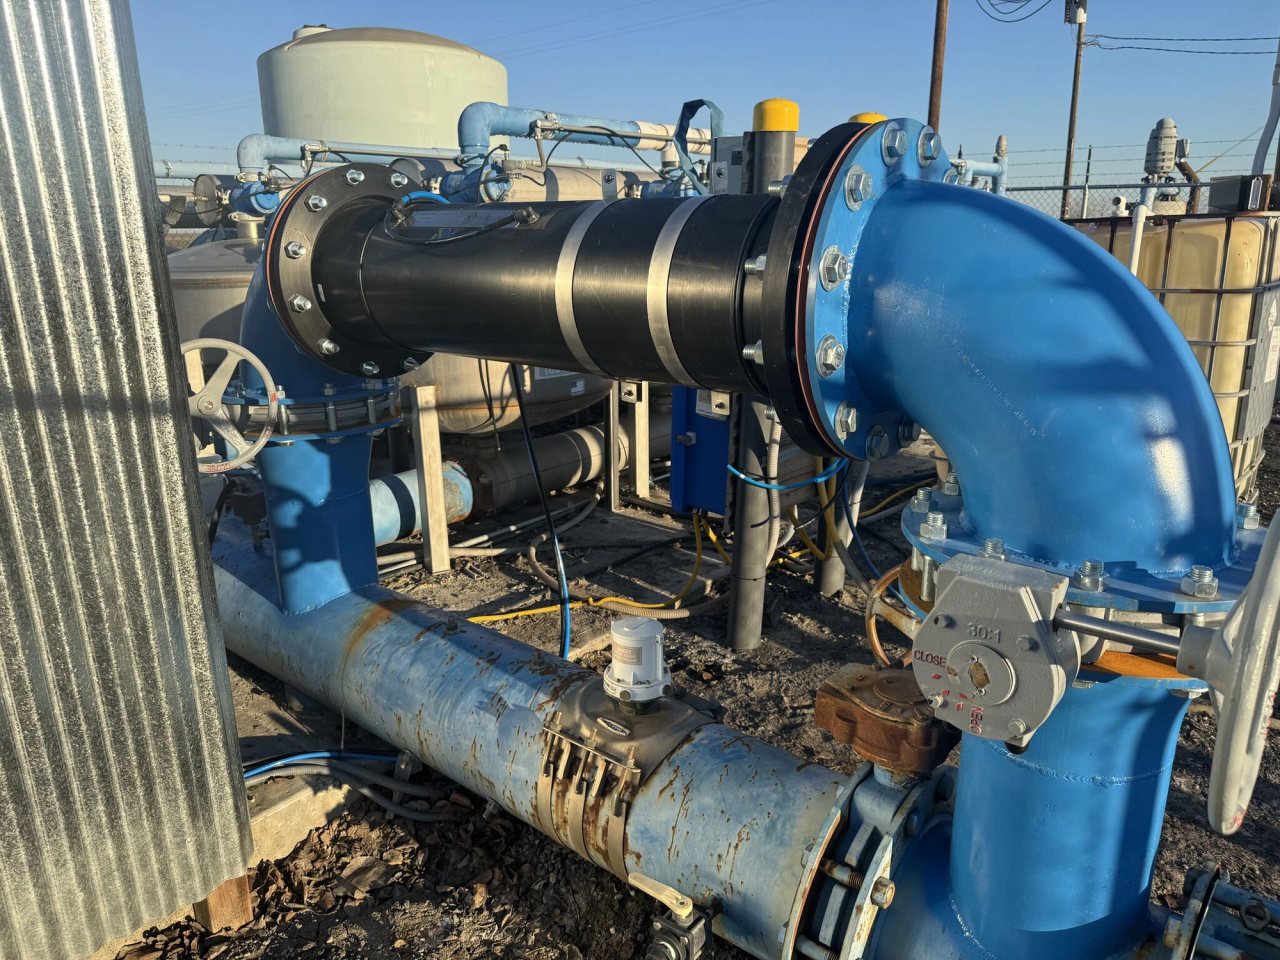
A nanobubble system has to earn its place on the farm twice: first in the irrigation line, then in the budget. The equipment must deliver oxygen at the flow and pressure the crop needs, and the resulting harvest or input savings must cover the cost of putting it to work.
Part 1 explored root-zone oxygen and crop research. This installment follows the investment decision from the pump station to the field comparison: what to install, what to measure, and how to calculate the return.
Start with the water moving through your farm
A typical installation combines a nanobubble generator, an air or oxygen supply, controls, pipework, and any pump needed to move water through the equipment. The layout follows the farm's water source, storage, irrigation schedule, and peak flow. There are three common arrangements[1]:
- Tank recirculation: Water cycles through the generator and returns to storage before irrigation. Ask how much water can be treated, how long treatment takes, and what oxygen level remains when irrigation begins.
- Inline treatment: The unit treats the irrigation flow as water moves toward the crop. Size it for the actual operating flow and available pressure.
- Sidestream treatment: A portion of the flow passes through the generator and rejoins the main line. Measure oxygen after the streams mix and again at a distant outlet.
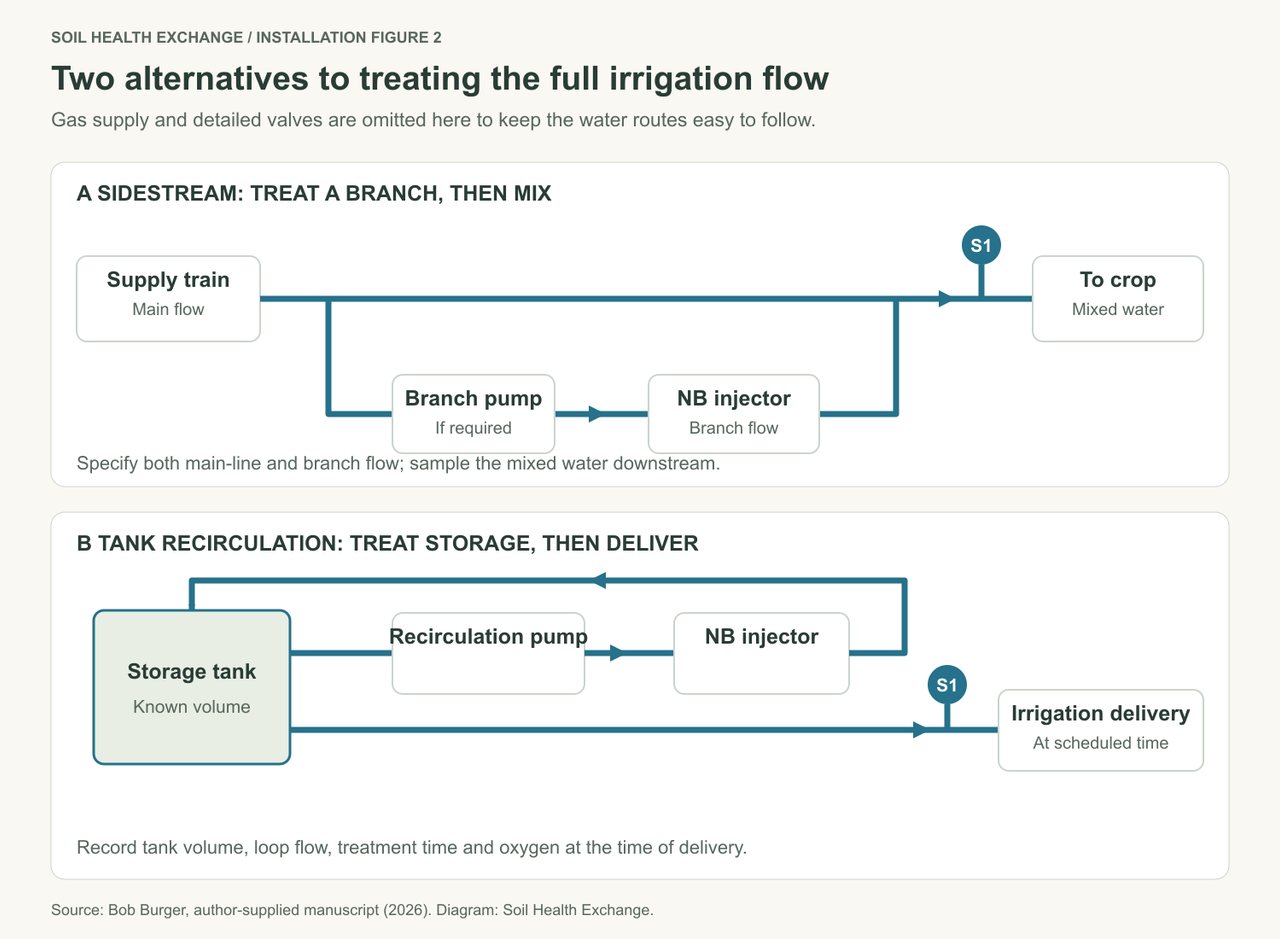
Keep treatment capacity and storage capacity separate. A rating achieved by repeatedly treating a tank needs an operating-time calculation before it can be compared with continuous treatment of fresh water.
For pump-driven ChucaoTech injectors, the water pump supplies the energy used to generate bubbles. Include the pump, compressor or oxygen concentrator, and controls in the power budget. Ask the installer to document the pressure loss through the proposed unit and any change in pumping demand[6][1].
Ask for a complete installation quote
The useful quote describes a working system at your site. Have the supplier specify flow, water pressure, water temperature, gas supply, and expected dissolved oxygen at both the equipment outlet and the far end of the irrigation line.
Ask for an itemized scope covering:
- The generator, required pumps, compressor or oxygen concentrator, controls, and electrical work.
- Filtration, pipework, isolation and bypass valves, backflow protection, sampling points, and fertigation connections.
- Freight, installation, commissioning, training, warranty, and service arrangements.
- Expected operating hours, power demand, consumables, cleaning, and replacement parts.
Confirm that the proposed system maintains emitter pressure and irrigation uniformity. Choose sampling points that let you check performance during normal irrigation, with the water and fertilizer program you will actually use[1].
My indicative installed-cost range is approximately $5,000 for a small field or greenhouse system to $150,000 for a roughly 400-acre row-crop installation. These are supplier estimates from my submitted manuscript; package scope and site requirements determine the actual quote[1]. At the upper example, $150,000 divided by 400 acres is $375 per acre upfront. Annual operating expenses belong on a separate line.
Install and hand over in six steps
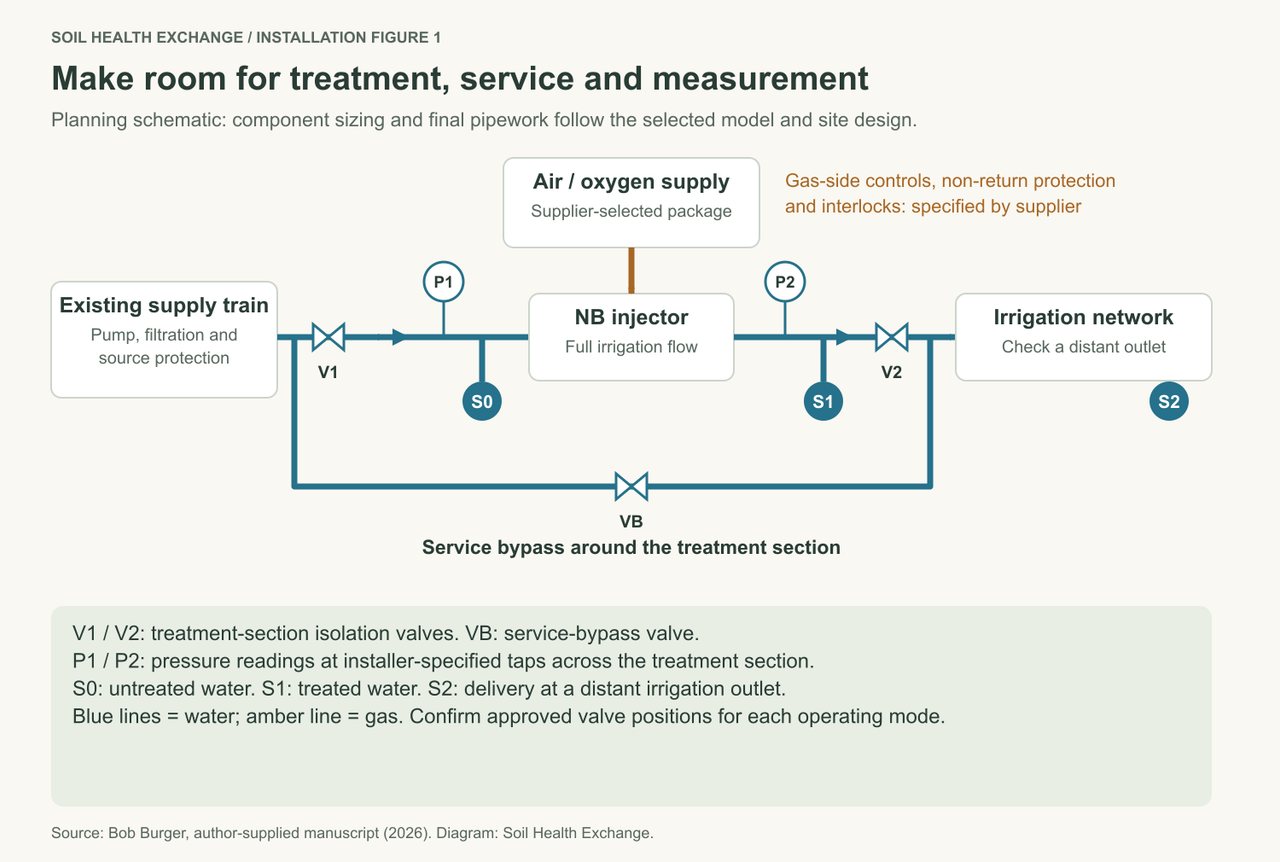
Use Figure 1 to agree on the pipework and access points before equipment arrives. Figure 2 shows how the water route changes for a sidestream or storage-tank system. The selected model's installation manual supplies pipe sizes, connection details, gas settings, and the startup and shutdown sequence.
- Record the site conditions. Measure the irrigation flow in gpm or m³/hour and operating pressure in psi or bar for each zone the unit will serve. Record water source, temperature, available electrical service, and the pump's performance information. For recirculation, add tank volume and the time available before irrigation.
- Approve the layout and operating limits. Have the installer mark the injector, pump, filtration, source protection, gas supply, isolation valves, bypass, pressure taps, and sampling points on the drawing. Obtain the model's permitted water-flow range, pressure loss, gas purity, gas pressure and flow, and power requirements. Agree on acceptable pressure at the emitters and oxygen at S1 and S2[6][1].
- Fit the water-side equipment. The installer shuts down, isolates and depressurizes the work area, then fits and supports the pipework under the approved design. Label V1, V2 and VB to match the drawing and record their positions for treatment, bypass and service. Where fertigation is present, have the installer confirm the required backflow protection and injection arrangement[9].
- Connect the gas supply and controls. Have the supplier specify the compressor or oxygen package, gas-compatible components, regulation, metering, non-return protection and control interlocks. Document how gas delivery stops when water flow stops. Complete electrical connections and functional checks under the equipment manual[1].
- Verify the hydraulics. Follow the model's commissioning sequence, check for leaks, and measure flow and P1/P2 at the agreed pressure taps. Compare the treatment section's pressure loss with its specification. Check pressure and irrigation uniformity at a distant outlet with the intended zone operating[6][1].
- Measure, record and hand over. Complete the three-point oxygen check below. Keep the approved drawing, actual operating settings, readings, service schedule and support contact with the irrigation records. Resolve any result outside the agreed limits before accepting the installation.
Commission the system with measurements
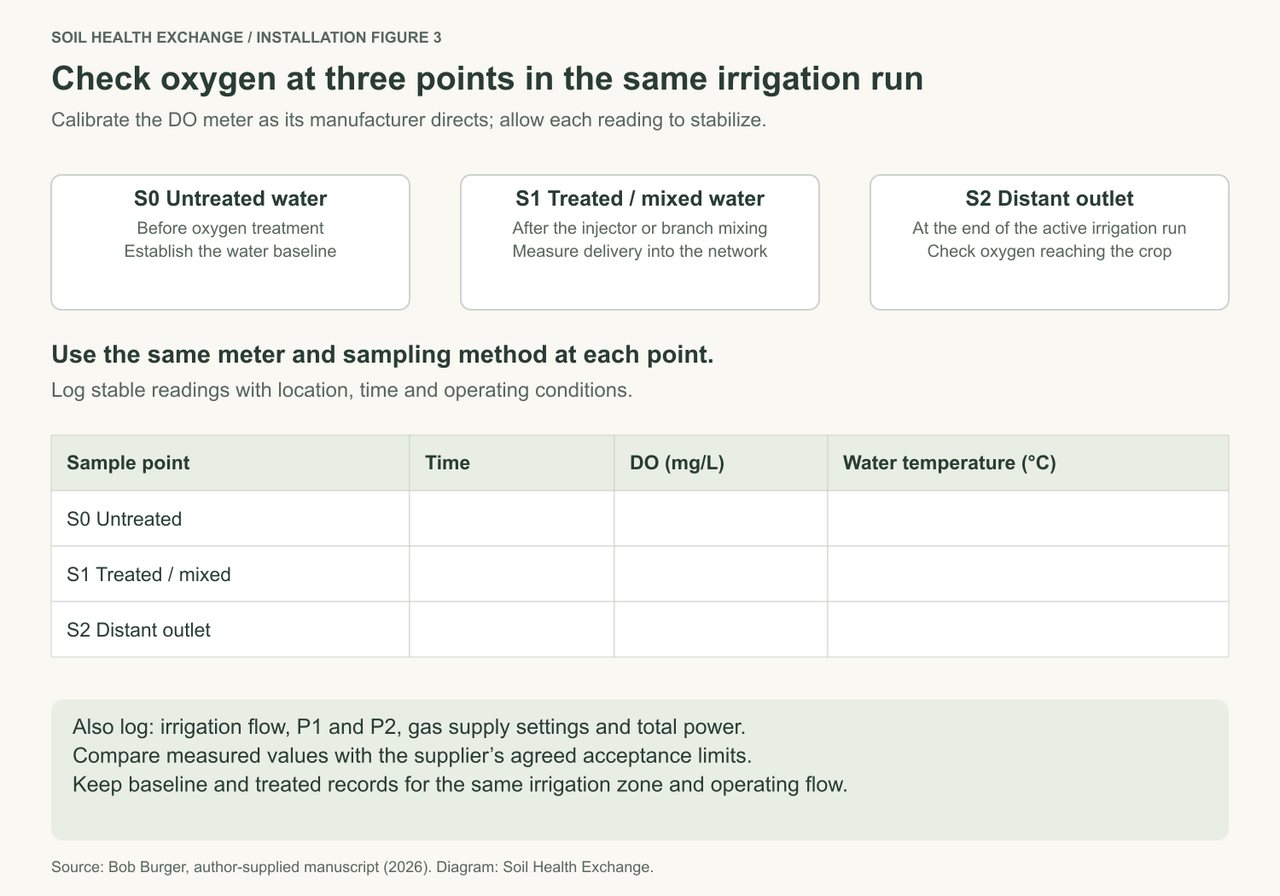
Use the same dissolved-oxygen meter and sampling method at S0, S1 and S2. Calibrate the meter as its manufacturer directs and allow the readings to stabilize. Record dissolved oxygen in mg/L, temperature, sampling time and location. Account for salinity in the meter setup when relevant to the water source[10].
Start with baseline readings under normal irrigation before oxygen treatment. After the supplier's startup procedure and a stable operating condition, measure untreated water at S0, treated or fully mixed water at S1, and delivery at a distant outlet at S2. For a tank system, include the oxygen reading at the actual irrigation time. Record water flow, P1/P2, gas settings and electricity use with the samples[1].
Ask how the supplier verifies nanobubble production as well as dissolved oxygen. These measurements answer different questions: one characterizes the bubbles; the other measures oxygen dissolved in the water.
The supplied ChucaoTech alfalfa report describes two southwestern U.S. installations. Source-water dissolved oxygen was reported at 6–7 mg/L; delivery readings were 9–10 mg/L with compressed air in Arizona and 14–15 mg/L with concentrated oxygen in California[2]. These supplier-reported observations identify useful measurements for commissioning. Because the sites differed in soil and location, choosing between air and oxygen requires a comparison under your own operating conditions.
Get a written maintenance schedule for filters, gas supply, leak checks, alarms, and cleaning. Track the labor and materials used. Keep drainage, irrigation scheduling, and soil structure central to root-zone management.
Build the annual budget around changes you can measure
Begin with additional crop sales and documented savings, then subtract the added annual cash expenses and any lost sales. This follows the partial-budget approach used by Iowa State University Extension[4].
For crop sales, use marketable production and the price received. Include the extra cost of harvesting, handling, packing, or hauling that production. For fruit and vegetables, record grade and size as well as total weight: a change in the saleable mix can matter as much as a change in tonnage.
For water savings, record the volume applied and the pumping or purchase expense avoided. If crop output rises while irrigation volume stays the same, record the benefit under crop sales. Fertilizer savings belong in the budget when a separate comparison shows that reduced purchases maintain acceptable yield and quality.
The lettuce paper supplied with this installment illustrates why the units matter. Researchers evaluated ten-day-old 'Little Gem' seedlings in a peat, coir, and vermiculite mix. Moderately diluted oxygen-nanobubble treatments improved early growth; the reported water saving of roughly 23% describes less water per unit of dry biomass. For a farm budget, measure seasonal irrigation volume and marketable harvest together[3].
Work out payback before buying
With a steady annual benefit, simple payback is the installed cost divided by the additional annual net cash benefit. If the benefit changes between seasons, accumulate the actual yearly cash flows until they recover the initial investment[5].
Consider an illustrative 100-acre installation costing $30,000, or $300 per acre upfront. Assume additional annual crop sales of $18,000, measured input savings of $2,000, and added annual cash expenses of $8,000. The expenses include electricity, gas supply, maintenance, paid labor, and handling the extra harvest.
The annual net cash benefit is $18,000 + $2,000 − $8,000 = $12,000, or $120 per acre. Simple payback is $30,000 ÷ $12,000 = 2.5 years.
Illustrative annual budget for 100 acres
| Annual budget item | Amount |
|---|---|
| Additional crop sales | $18,000 |
| Measured input savings | $2,000 |
| Added annual cash expenses | −$8,000 |
| Additional annual net cash benefit | $12,000 |
| Simple payback on $30,000 installed cost | 2.5 years |
These are teaching assumptions supplied by Soil Health Exchange. The example uses steady benefits from the first year and excludes financing, taxes, and resale value. Check equipment life and the timing of seasonal cash receipts when assessing the full investment[5].
Now reduce the assumed additional crop sales by half. The annual benefit becomes $9,000 + $2,000 − $8,000 = $3,000, extending simple payback to 10 years. With no added sales and the same savings and expenses, the annual result is −$6,000. Testing a weaker crop response shows how much the investment depends on yield.
You can also work backward from an acceptable recovery period. Recovering $30,000 in three years requires $10,000 of annual net cash benefit. With $8,000 in added annual expenses and $2,000 in savings, the crop must generate $16,000 in additional annual sales, or $160 per acre across 100 acres. That gives the field comparison a concrete target.
Let the field comparison decide the next acres
Start with comparable treated and untreated blocks, replicated where practical. Keep crop variety, planting date, irrigation volume, and fertilizer management consistent for the initial comparison. Test input reductions separately so you can identify which change produced the result[1].
Record marketable yield, grade, price, applied water, nutrient purchases, electricity, labor, and maintenance. In a crop with several cuttings or pickings, record each harvest and total the full season. Pair those records with oxygen readings, soil moisture, root observations, and weather.
Before expanding, put the measured additional cash benefit beside the installed cost per acre and the recovery period your farm can support. A successful trial leaves you with three things: an installation that works at your irrigation flow, a crop response you can measure, and a budget that supports the next investment.