Every Drop Has a Job: A Practical Guide to Farm Water Conservation
Follow water across the farm, find the losses worth fixing, and build a practical conservation plan for rainfall, irrigation, soil, storage, and water quality.
Editor's Note
This article was prompted by reader feedback asking for practical water-conservation coverage. No business paid for or reviewed it.
SH
By Soil Health Exchange Team||17 min read|17 reads
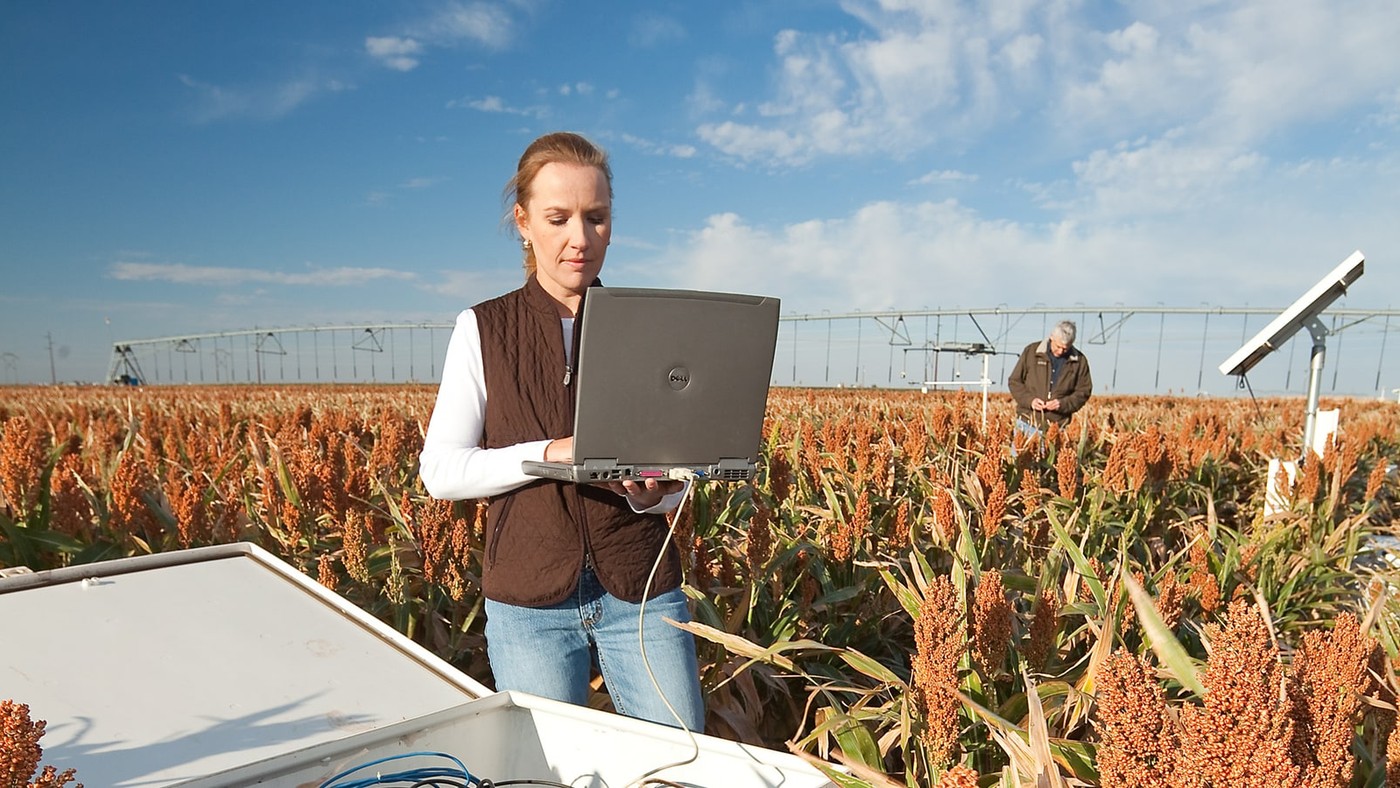
USDA-ARS technician Jourdan Bell reviews soil-water measurements in a sorghum field while soil scientist Robert Schwartz checks the crop under deficit irrigation. Field data can connect irrigation timing with what is happening in the root zone. — Credit: Stephen Ausmus, USDA Agricultural Research Service (public domain)
The bottom line
Water conservation becomes easier when you follow the water across one field or irrigation zone. Map where it enters, how evenly it is applied, whether it reaches active roots, and where it goes next. A meter, rain gauge, soil check, and a few good records can point to a manageable first move—perhaps repairing a leak, improving uniformity, changing irrigation timing, protecting the soil surface, capturing roof water, or redesigning a problem area.
Water conservation can begin with a surprisingly useful question: where does the water go? Follow a gallon across the farm and it may reach roots, run off, evaporate from bare soil, leak from a fitting, move below the root zone, return to a stream or aquifer, or leave productively through the crop. Once you can see those paths, you can decide which one is most worth improving.
That question opens useful choices on almost any operation. A market garden may find its best opportunity in drip uniformity, mulch, and greenhouse-roof capture. A center-pivot farm may gain more from pressure checks, nozzle replacement, soil-water monitoring, and better timing. A rainfed farm may focus on infiltration, rooting depth, residue, and runoff pathways. The scale changes; the questions stay remarkably similar.
Give every drop a useful destination
Good conservation gives more of the water you already have a useful job: supporting the crop, building flexibility during dry periods, reducing avoidable losses, and protecting water quality. The best result is not always the fewest gallons—it is the right amount reaching the right place at the right time.
Begin with a one-page water map
On your next walk after irrigation—or after a soaking rain—sketch the route from source to root zone to exit. Mark the pieces that matter on your farm: wells or turnouts, ponds and roofs, pumps and valves, wet spots and dry strips, compacted headlands, slopes, drains, and waterways. Add the crop and expected rooting depth in each managed zone. A rough pencil map is enough to make patterns visible.
Follow the water across the farm
Part of the path
Questions to ask
A useful first measurement
Source
How much is available, when, and with what quality?
Meter reading, delivery record, pump rate, basic water test
Delivery
Where do pressure, leaks, clogs, or open-channel losses change the flow?
Pressure at the beginning and end; flow by zone; visible leak check
Application
Is water reaching the whole zone at a similar depth and rate?
What limits change: water right, delivery schedule, salinity, food safety, labor, power, or budget?
Write down the constraint before choosing a practice
The map does not need to be polished. Its job is to show where one measurement could replace a guess.
This attention can pay off in more than gallons. In USDA's 2023 irrigation survey, 212,714 U.S. farms applied 81 million acre-feet of water across 53.1 million irrigated acres. Farmers and ranchers also spent $3.3 billion on pumping energy and $3 billion on irrigation equipment, facilities, land improvements, and computer technology. [1] A well-chosen improvement may support reliable production, lower energy costs, reduce runoff or erosion, and create more flexibility when supply is limited.
Use a six-step water conservation ladder
Know the amount. Measure flow, runtime, rainfall, and the depth of water applied.
Make application even. Repair leaks and solve pressure, nozzle, emitter, or land-leveling problems.
Schedule to the root zone. Use crop demand, soil water, rooting depth, and growth stage to decide when and how much.
Help rain and irrigation enter the soil. Protect the surface, maintain roots, and address compaction or concentrated flow.
Capture and reuse where it fits. Match a safe source and storage system to a real demand.
Count the wider benefits. Track water quality and recognize both farm-level efficiency gains and any water savings that extend to the wider basin.
The order helps. Start with measurement and uniformity, and every later investment becomes easier to size and evaluate. Repairing a broken line may deliver more value than a new controller. Moving a poorly placed sensor may teach you more than adding another one. Matching a tank to monthly rain and actual demand may matter more than choosing the largest tank that fits.
1. Measure one irrigation from start to finish
For a first pass, choose one representative field, tunnel, block, or irrigation zone. Record the meter before and after, the start and stop times, rainfall since the previous irrigation, crop stage, and soil moisture before and after. On a small outlet, a known container and stopwatch can give you a useful flow estimate. Larger pressurized or open-channel systems call for a properly selected and installed measurement device.
Turn gallons into a depth you can use
One acre-inch is about 27,154 gallons. For any bed, tunnel, or zone: applied depth in inches = gallons ÷ (area in square feet × 0.623). Applying 6,230 gallons across 10,000 square feet is about one inch. Use the irrigated area—not the whole farm.
Once you know the depth applied, connect it to the questions the crop is asking: When does water need to arrive? How much can the active root zone hold? How evenly will the system deliver it? What rain has already contributed? The NRCS Irrigation Water Management standard brings those same pieces together and points producers to each state's Field Office Technical Guide for local criteria. [2]
A minimum measurement kit by scale
Setting
Start with
Add when the first records reveal a need
Garden, tunnel, or small diversified farm
Hose or zone flow, runtime, bed area, rain gauge, hand soil check
Two-depth soil sensor, filter-pressure gauges, emitter-output test
Drip-irrigated field
System flow, pressure at head and tail, runtime, zone area, emitter checks
Telemetry, flow alerts, water-quality and clogging diagnosis
Sprinkler, wheel line, or pivot
Meter or pump rate, pressure, nozzle inventory, catch-can pattern, wind
Inflow, set time, advance and recession, tailwater, field slope
Surge or automation assessment, land-leveling survey, tailwater recovery analysis
Rainfed field
Rainfall, runoff paths, soil cover, rooting depth, soil water by depth
Repeatable infiltration checks, compaction assessment, field-zone records
Use the smallest set of measurements that can answer the current question; add complexity only when it earns its place.
2. Fix uneven water before changing the total
A field can be too wet and too dry at the same time. If one part of a zone receives less, the natural response is to run the whole system longer. The weak area improves, but the rest may receive more than the crop can use. That is why leaks, plugged emitters, worn nozzles, incorrect spacing, pressure loss, wind, elevation, and poor surface-irrigation advance deserve attention before you shorten or lengthen runtime.
Measure output at the beginning, middle, and end of a drip zone, or run a catch-can test across a sprinkler pattern. Compare like with like and note wind and pressure. If a few low readings explain the crop pattern, repair the system and repeat the test. Better uniformity can improve the crop while also reducing the extra water previously used to rescue the driest spots.
3. Let crop demand and the root zone set the schedule
There are two useful views of irrigation scheduling. A weather-based checkbook estimates what the crop has used through evapotranspiration, or ET, then subtracts effective rain and irrigation. Soil monitoring shows what actually happened in the field. Use them together when you can: ET helps you look ahead, while the soil helps you check the balance.
Place soil sensors in representative management zones and at depths that can show both the active root zone and water moving below it. Then verify the readings with a hand probe, auger, or soil feel. A sensor at one depth can miss shallow drying or deep drainage; a sensor beside a leaking emitter can confidently report the wrong story. Rooting depth also changes through the season, so the same number may deserve a different decision at emergence and peak growth.
Here is what that potential can look like when the sensor, soil, crop, and decision threshold fit one another. In on-farm corn and soybean studies in Arkansas and Mississippi, a specified WATERMARK sensor method reduced water applied by up to 40% while maintaining or improving yield; reported net returns rose by up to $39 per acre. [3] The useful idea to carry home is the process: good placement, a locally tested threshold, and records that connect water with crop response.
The same idea works on mixed vegetable farms, where several crops and planting dates may share one zone. A nine-farm northern Colorado study found wide variation among farms, fields, and seasons. The authors presented ET minus effective precipitation as a useful benchmark for weekly or retrospective checks, while noting that a single benchmark cannot represent every crop and growth stage in a mixed zone. [4] If one valve serves lettuce, squash, and tomatoes, irrigation-zone design may be as important as scheduling technology.
Satellite ET tools can add another view, especially when field-scale records are sparse. OpenET combines multiple established satellite-based approaches to estimate actual ET at field scale in the western United States. [5] Treat remote estimates as a decision aid, not a substitute for a meter, local weather, crop knowledge, or a soil check.
4. Turn rainfall into root-zone water
A rain does more for the crop when it enters the soil, remains available, and can be reached by roots. That gives you several places to help. Residue can soften raindrop impact. Roots and stable aggregates can improve the path into soil. Managed traffic can protect pore space, while a well-placed waterway can safely handle concentrated flow. Each practice works on a different part of the journey.
Across 89 field studies, a meta-analysis found the largest average infiltration-rate gains where annual systems added perennials or cover crops: 59.2% and 34.8%, respectively. No-till alone had a small, statistically nonsignificant average effect, while results were stronger in wetter climates and where residue was retained. [6] That leaves plenty of room to design for your farm: continuous roots, surface protection, and thoughtful combinations may all help rainfall find a better path into the soil.
Infiltration is the doorway, not the storage tank
Faster entry can reduce runoff, but available water still depends on soil texture, structure, profile depth, rock fragments, compaction, drainage, salinity, rooting, and how wet the soil was before the storm. See [How Much Extra Water Does Healthy Soil Actually Hold?](/blog/how-much-extra-water-does-healthy-soil-actually-hold-debunking-the-20000-gallons-claim) for the full calculation.
In dryland systems, keeping a cover crop alive also uses water. That can still be a worthwhile trade when the cover improves forage, erosion control, residue, weeds, or long-term function—but rainfall zone, species, biomass, soil, and termination date matter. Our guide The Dryland Cover-Crop Water Tradeoff helps work through that decision without assuming the answer is always yes or always no.
5. Use mulch where it can earn its keep
Mulch can shade the soil, soften raindrop impact, reduce crusting and erosion, and limit nonproductive evaporation. Crop residue, straw, wood-based materials, paper, and films do not behave the same way, and neither do a high tunnel, an orchard row, and a no-till grain field. Choose the material and coverage for the job.
The NRCS Mulching standard offers a useful reminder that coverage should match the purpose. It has used at least 90% surface coverage when reducing potential evaporation is the goal and at least 70% when protecting an establishing seedbed. [7] The sweet spot still depends on material and crop: enough cover to do the job, while leaving the soil able to receive water and air. Your state's current standard and local crop guidance can help fine-tune material, rate, temperature, pest risk, and maintenance.
6. Match captured water to a useful job
A roof can turn a quick runoff pulse into a useful supply for transplants, wash-down, livestock, or irrigation when the water quality and local rules fit that use. Begin by naming the job, then compare monthly supply with monthly demand. EPA's planning method uses 0.623 gallon per square foot for each inch of rain and a 75% collection-efficiency assumption. It uses monthly rainfall so the water is counted when it is likely to arrive—not just as one impressive annual total. [8]
A quick roof-water estimate
Catchment area × rainfall × 0.623 × capture efficiency = estimated gallons. A 2,000-square-foot roof receiving 1.25 inches of rain at 75% capture could yield about 1,168 gallons—enough to make a real contribution to a well-matched use. Roof geometry, first-flush choices, overflow, freezing, tank capacity, and timing will shape how much of that potential you can put to work.
From there, design a system that is easy to live with: screened inlets, a covered and well-supported tank, a dependable overflow, cleanable components, backflow protection where required, and a plan for sediment and winter. NRCS Water Harvesting Catchment standard 636 connects planning and design with local and state rules and the state Field Office Technical Guide. [9] For tailwater reuse, ponds, recharge, or larger catchments, local engineering and water-resource expertise can help turn a good idea into a durable fit.
Choose safe uses from the start
If captured or reused water may touch produce or food-contact surfaces, make food safety part of the design. For covered produce, the FDA's current preharvest agricultural-water rule uses a systems-based assessment; harvest and postharvest uses have separate requirements. [10] Checking which rules apply to your farm and intended use early can help you choose the right treatment, plumbing, or alternative use without having to rework the system later.
7. Keep conserved water clean
Good water conservation leaves water in better shape as well as making better use of its volume. Keeping irrigation with the crop can also keep sediment, nutrients, and crop-protection products out of runoff. Water testing, application rate, nutrient timing, chemigation safeguards, and drainage all help quantity and quality work together. Reused water may bring a different salinity, clogging, or microbial profile, so include those qualities when matching a source to its job.
The right amount still depends on the job. A saline system may need enough water and drainage to maintain an appropriate salt balance in the root zone. A newly seeded field has different needs from a mature crop. Frost protection may be managing the microclimate rather than replacing soil water. Define the purpose first, and success becomes much easier to measure.
Count two kinds of wins: the farm and the basin
A repaired system may pump less water, use less energy, reduce erosion, simplify labor, and improve crop uniformity. Those gains are worth measuring and celebrating. Then add a second question: did the change also leave more usable water in the wider basin? Some runoff or deep percolation may already return to a stream or aquifer, and a more capable system may change future acreage or crop choices. Researchers therefore look at return flows, consumed water, water quality, and future use when estimating basin-wide savings. [11]
Two ledgers reveal more of the value
The farm ledger tracks water diverted or pumped, energy, labor, runoff, crop response, and cost. The watershed ledger asks whether consumptive use changed and whether former runoff or deep percolation was reusable. Together they show both the direct value to the farm and any wider contribution to shared water supplies.
Match the symptom to the first check
A field guide to common water clues
What you see
Check first
A promising next move
Add to the picture
Alternating wet and dry stripes
Pressure and distribution pattern
Clean or replace emitters or nozzles; correct spacing or pressure
Use a lower rate, shorter cycles, residue or mulch, or address sealing and compaction
Give concentrated flow a stable outlet as part of the solution
Soil is wet below active roots
Depth per event and sensor placement
Shorten the event or split it; move or add a deeper sensor
A shallow-rooted crop may not use the full stored profile
Plants wilt while the sensor says wet
Sensor location, rooting, compaction, salinity, disease, and heat
Ground-truth with a probe and inspect roots
Check whether the measured water is within reach and plant-available
Irrigation continues after useful rain
Rain record and scheduling routine
Add a rain gauge or local weather feed and a stop rule
Verify how deeply the rain moved and how much ran off
Late-season water use seems high
Crop stage, ET, leaks, and zone runtime
Reset runtime and inspect low-demand zones
Mixed crops may share a valve but need different schedules
Potable water supplies a tunnel or garden
Roof area, monthly rain, demand, and safe uses
Improve drip and mulch first, then size capture and storage
Rules, water quality, overflow, freezing, and food safety
A low-yield edge repeatedly ponds or erodes
Flow path, compaction, topography, and field-zone economics
Consider a grassed waterway, buffer, perennial use, drainage correction, or reshaping
Local design help can turn concentrated flow into a stable system
Treat each clue as a hypothesis. Measure before and after so the farm can tell you whether the fix worked.
Try a 30-day water tune-up
Draw the map. Choose one field or zone and mark its source, delivery path, root zone, and exits.
Measure one event. Record flow or gallons, runtime, area, pressure where relevant, soil water before and after, and any rain.
Name the largest avoidable loss. Pick one: leak, unevenness, poor timing, runoff, deep movement, bare-soil evaporation, or unusable roof runoff.
Make one manageable change. Repair a fitting, clean emitters, replace nozzles, adjust pressure, move a sensor, protect the surface, or change one schedule.
Set a decision rule. Write the threshold that starts or stops irrigation and who checks it. Include exceptions for delivery schedules, critical crop stages, heat, salinity, or establishment.
Compare before and after. Recheck water applied, uniformity, root-zone moisture, runoff, crop response, labor, energy, and cost. Keep the change that helps, revise the one that does not, and move to the next largest opportunity.
Build the next improvement around your farm
A strong water plan rarely begins with a complete redesign. It begins when one vague concern becomes a measured question: How much did we apply? Why is the tail end dry? Did that inch of rain reach six inches deep? Is the September schedule still following July demand? Could this roof supply transplant water during the months we need it?
Once that question has an answer, the next investment becomes easier to choose. It might be a five-dollar gasket, a new nozzle package, a soil probe, a different valve layout, more residue, a grassed waterway, a roof tank, or a full irrigation redesign. You do not have to solve it alone. Explore the funding finder, then ask your local NRCS, conservation district, Extension, irrigation district, or water-resource agency about current technical assistance and cost-share options for your place and practice.
Water conservation is not a single technology or a promise that every drop can be saved. It is a habit of following the water, giving it a useful job, and learning from what the field sends back. Start with one zone and one irrigation—or one good rain. That is enough to make the first improvement visible.
Soil Health Exchange Team (2026). Every Drop Has a Job: A Practical Guide to Farm Water Conservation. Soil Health Exchange. https://soilhealthexchange.com/blog/farm-water-conservation-practical-guide
More citation formats
MLA
Soil Health Exchange Team. "Every Drop Has a Job: A Practical Guide to Farm Water Conservation." Soil Health Exchange, 2026-09-09, https://soilhealthexchange.com/blog/farm-water-conservation-practical-guide.
Chicago
Soil Health Exchange Team. "Every Drop Has a Job: A Practical Guide to Farm Water Conservation." Soil Health Exchange. Published 2026-09-09. https://soilhealthexchange.com/blog/farm-water-conservation-practical-guide.

Discussion
No comments yet. Be the first to share your thoughts!